Visual Scripting Tutorial (Logic Bricks)
Opening a Door After Collecting All Items
Lesson 7 of 10 • 10 XP
Keep your place in this quest
Log in or sign up for free to subscribe, follow lesson progress, and access more learning content.
In this lesson, we will use the collectable item logic created previously to trigger an action inside the game.
As an example, we will make a door that blocks the player’s path be removed from the scene only after all items in the map have been collected.
This is a very common gameplay structure: the player completes an objective, and the game reacts by unlocking something. It could be a door, a platform, an elevator, a bridge, a cutscene, a boss fight, or any other progression event.
In this lesson, you will learn how to access and manipulate one Entity from the logic of another Entity. In this case, the Player will check the collection progress and then remove the Door from the scene.
1. Creating the Logic to Remove the Door
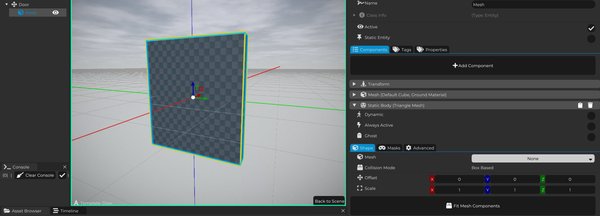
Let’s start by creating a new Entity Template for our door.
Configure the Mesh that will be used as its visual representation and add a physics component so the door can block the Player’s passage.
Since the door should prevent the character from moving through it, do not enable the Ghost option in the physics component.
A Ghost physics body can detect collisions, but it does not physically block movement. For the collectable item, that was exactly what we wanted. But for the door, we want the opposite: the Player should not be able to pass until the condition is completed.
By pressing the 3 key, you can visualize the collision preview of the Entity. This is useful to confirm if the physical shape is matching the door correctly.
Cave gives you different ways to configure the physics shape. You can use the object’s own mesh as the collision, import a different optimized model made only for physics, or even use any other Mesh from the project as the collision shape.
Choose the option that best fits the needs and performance of your game.
The system we created previously already gives us exactly the information we need to control when the door should be removed.
It automatically calculates the total number of collectable items present in the scene, no matter how many items exist in the map, and it also keeps track of how many of them were already collected by the Player.
This makes the logic very flexible. We do not need to manually change a number every time we add or remove items from the level. The counter will continue working correctly, automatically adapting to the amount of collectables available in the scene.
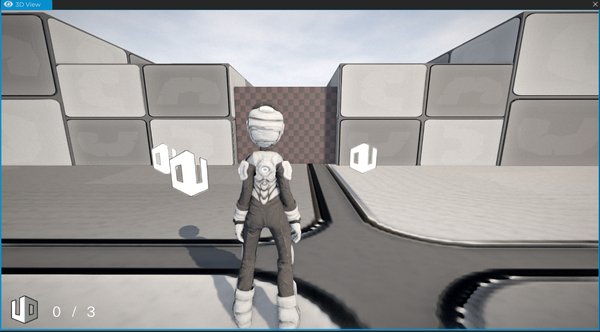
With these two pieces of information available — collected items and total items — we can simply compare both values.
When the number of collected items is equal to the total number of items in the map, it means the player found all collectables and completed the objective required to open the path.
From this condition, we will execute the logic responsible for removing the door from the scene, allowing the player to move forward to the next area of the game.
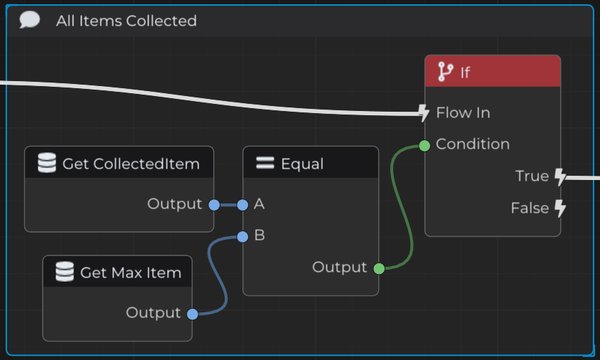
After updating TextCollect, we will check if all items in the map were already collected.
To do that, get the Collected Item and Max Item properties and use a comparison node to verify if both values are equal.
If the condition is true, it means the player collected every available item in the scene and completed the requirement needed to unlock progression.
From this verification, we can execute the logic responsible for removing the door and allowing access to the next area.
To do this, we will access and manipulate an Entity from the Player logic.
First, get the Scene and use the Get Entities With Name node, passing the name of the door Entity. In this case, the name is Door.
This node returns a list of Entities found with that name.
Then use a Get node to retrieve the element at index 0, which corresponds to the first Entity found with that name.
Finally, connect that Entity to the Kill node.
When this logic is executed, the door will be removed from the scene.
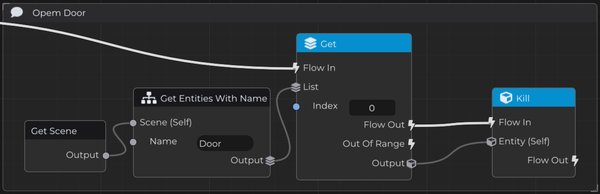
It is important to understand what is happening here.
The Player is not directly connected to the Door as a child or parent Entity. Instead, the Player gets the current Scene, searches for an Entity named Door, retrieves it from the result list, and then removes it.
This means you can create logic where one object affects another object in the scene, which is essential for creating gameplay interactions.
One thing to keep in mind is that Get Entities With Name returns a list because there may be more than one Entity with the same name. In this example, we are getting index 0, which means we are using the first result found. For this simple case, that is fine. But in larger projects, it is a good idea to keep important Entity names organized, or use tags and other references depending on the situation.
This logic can be expanded in many different ways.
In this example, we used the collection of all items to remove a door, but the same principle can be applied to almost any event inside your game.
Instead of removing a door, you could:
- move a platform
- activate an elevator
- play a cutscene
- enable a lever
- start a boss fight
- unlock a new area
- spawn enemies
- change the objective of the level
The most important thing is to understand that you now have the tools needed to create objectives and rewards using Cave’s visual logic.
Because of that, a great exercise is to try adapting this system into something different from the example shown in this lesson. You can create your own condition, your own reward, and explore new possibilities using everything you learned so far.