Visual Scripting Tutorial (Logic Bricks)
Introduction to Logic Bricks
Lesson 1 of 10 • 10 XP
Keep your place in this quest
Log in or sign up for free to subscribe, follow lesson progress, and access more learning content.
In this lesson, you will learn the basic concepts of Logic Bricks in Cave Engine. You will understand what they are, what they are used for, how to create a new Logic Brick asset, and how to add it to an Entity.
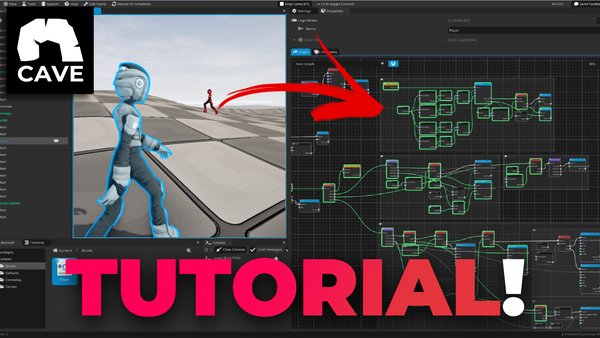
There is also a video tutorial about Logic Bricks that you can follow along with this lesson:
Watch the Logic Bricks video Tutorial
Logic Bricks are Cave Engine’s visual logic system. They allow you to create gameplay behavior using a visual node-based workflow instead of writing all the logic manually in Python. You can think of a Logic Brick as a visual script: it stores a group of connected nodes that describe what should happen in the game.
For example, you can use Logic Bricks to create simple behaviors such as:
- moving a player when a key is pressed
- making an object rotate every frame
- opening a door when the player gets close
- playing a sound when something happens
- activating or disabling Entities
- creating simple interactions, triggers, and gameplay rules
This does not mean that Logic Bricks replace Python scripting completely. Instead, they give you another way to create logic inside Cave. For many simple or medium gameplay behaviors, Logic Bricks can be faster and easier to understand because you can see the logic visually. For more advanced systems, you can still use Python scripts whenever you need more control.
In this first lesson, we will focus only on the basic setup: creating a Logic Brick asset and connecting it to the Player Entity. In later lessons, you will start adding actual visual logic inside it.
1. Adding a Logic Brick
In this step, you will learn how to create a new asset of type Logic Brick inside the Content panel. This asset will store the visual logic tree that we will later edit.
To create it, right-click inside the Content panel and create a new Logic Brick asset.
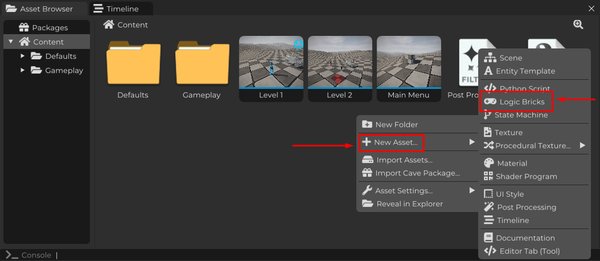
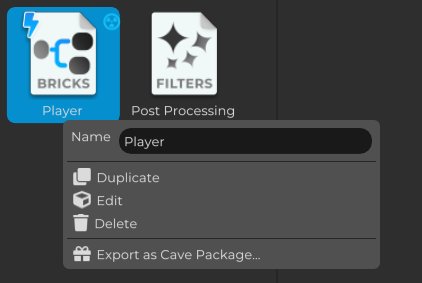
After creating the asset, let’s rename it to make it easier to identify and find inside the project.
Since this Logic Brick will be used by the Player, rename it to something simple and clear, such as Player.
This may look like a small detail, but naming your assets properly is very important. As your project grows, you will probably have many different scenes, templates, meshes, materials, sounds, scripts, and Logic Bricks. Good names make it much easier to understand your project later.
Now we need to add this Logic Brick to the Entity that will use it in the game.
In this example, the Entity will be the Player.
There are two ways to do this.
The fastest way is to select the Player Entity and then double-click the Logic Brick asset that you created previously. Cave will automatically add or link the Logic Brick to the selected Entity.
This is the quickest workflow when you already have the correct Entity selected.
Another option is to edit the Player template and manually add the Logic Bricks component, then assign the Logic Brick asset to it.
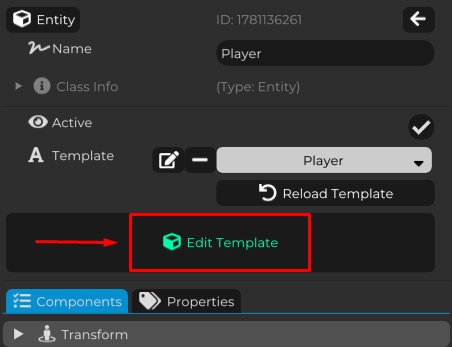
To add the component manually, first select the Player Entity and click Edit Template.
This allows you to modify the Player template itself, including its components.
This is important because the Player is usually an Entity Template. If you edit the template, the change will be applied to every instance of that Player in your project. If you only edit one local Entity in the scene, the change may affect only that specific instance.
So, when you are adding logic that belongs to the Player as a reusable object, editing the template is usually the correct approach.
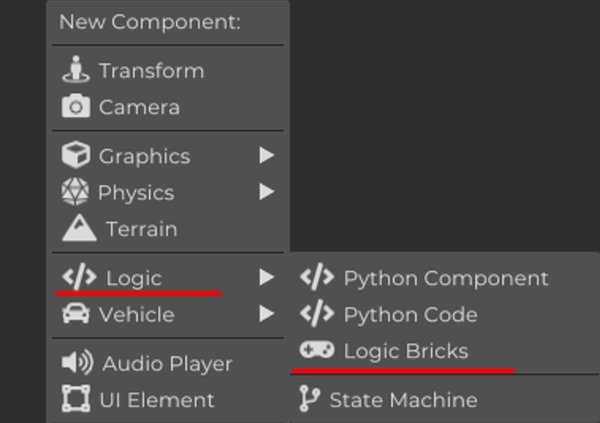
Now add a new component to the Entity by selecting Logic → Logic Bricks.
This component is what allows the Entity to use a Logic Brick asset.
The Logic Brick asset stores the visual logic, but the Entity still needs a component telling Cave which Logic Brick tree should be executed by that Entity. This is the role of the Logic Bricks component.
After adding the component, locate the Node Tree field.
In this field, select the Logic Brick called Player, which was created and renamed in the previous steps.
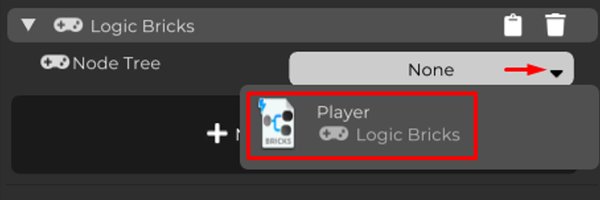
By doing this, you are telling the Player Entity to use the Player Logic Brick as its visual logic tree.
At this point, the setup is ready. You now have:
- a Logic Brick asset created in the project
- the asset renamed to Player
- the Player template opened for editing
- a Logic Bricks component added to the Player
- the Player Logic Brick assigned to the component’s Node Tree field
This is the basic connection between an Entity and a Logic Brick.
The Logic Brick asset contains the visual logic, and the Entity uses the Logic Bricks component to execute that logic in the game.
In the next lessons, you will start editing the Logic Brick itself and adding nodes to create actual gameplay behavior.