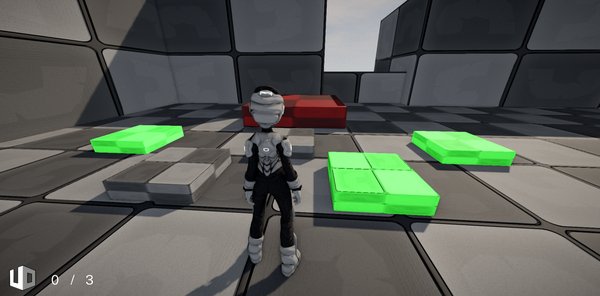
Visual Scripting Tutorial (Logic Bricks)
Creating the Platform Buttons
Lesson 9 of 10 • 10 XP
Keep your place in this quest
Log in or sign up for free to subscribe, follow lesson progress, and access more learning content.
In this lesson, we will finish the system we started in the previous lesson by creating the buttons that will connect to the platform logic and complete the interaction between both systems.
During this process, we will explore several important concepts in Cave’s visual logic system. You will learn how to detect collisions using a Rigid Body, use the Delay node to control when actions happen over time, change the color of an Entity during gameplay, and also practice creating and using functions to keep your Logic Bricks organized and reusable.
By the end of this lesson, we will have a complete system where buttons can be activated by the Player and communicate correctly with the platform created previously.
1. Creating the Button
To start creating the button, first create a new Entity Template.
Then rename the Entity according to its purpose, configure the Mesh that will be used as its visual representation, and add the necessary physics components so it can interact correctly inside the game.
After that, create a new Logic Brick and link it to the button Entity.
This process is very similar to what we did previously when creating the platform, so this is also a good opportunity to practice the concepts you already learned.
At the end of this step, we will have the basic structure of the button ready to receive its activation logic.
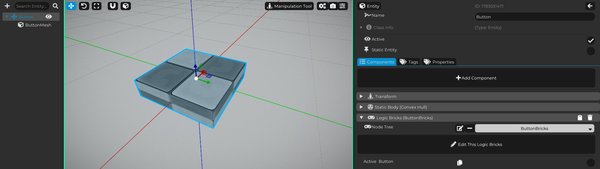
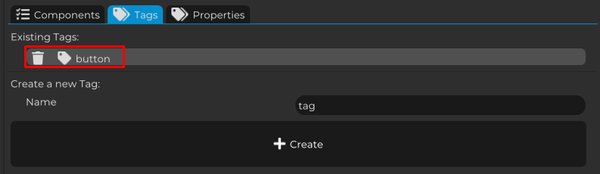
Now, there is a very important step: we cannot forget to add the button tag to the button Entity.
If you remember, in the previous lesson we already prepared the platform logic to automatically count how many buttons exist in the scene using this exact tag.
Because of that, the tag needs to be created and assigned to the button using the same name that was used in the platform logic.
If the tag name is different, even by a small detail, the platform will not be able to find the buttons correctly and the count will not work as expected.
So before continuing, make sure you create the button tag and add it to the button Entity.
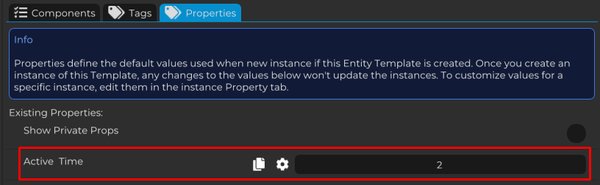
Now let’s also add a property to the button Entity.
We use the button tag to identify the button inside the map, but we will use a property to control part of its behavior.
Create a new property called Active Time, of type Float.
This property will store how long the button should remain active before automatically returning to the inactive state.
This makes the system more flexible because each button can have a different activation time. For example, one button can stay active for 3 seconds, while another button can stay active for 10 seconds, without changing the Logic Brick itself.
2. Creating the Button Logic
Now that our Entity is ready, with the tag and property configured, let’s start creating the button behavior.
The first step is to detect the collision between the button Entity and the Player, so we can activate it when the Player touches it.
However, before implementing this logic, we need to consider one important detail: we only want the button to be activated when it is currently inactive.
Since the button will have two different states, active and inactive, we need a way to store which state is currently being used.
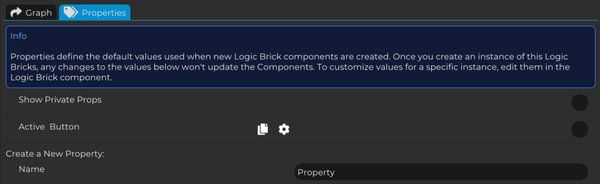
To do this, create a new property in the button Logic Brick called Active Button, of type Boolean.
This property will store the current state of the button, indicating whether it is active or not. We will use this value in the next steps to control the entire behavior of the button.
Now we can start building the visual logic.
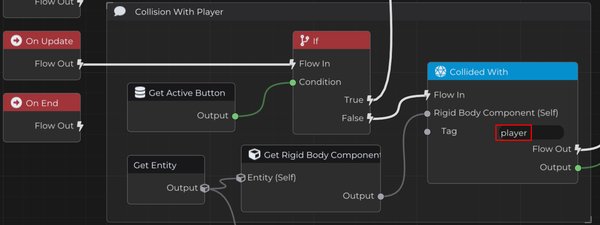
In On Update, we will constantly check if the button is active or inactive using the Active Button property that we just created.
To do that, get its value using Get Active Button and use an If node to check its state.
If the condition is False, it means the button is inactive and can be activated. In this case, we will detect the collision between the button and the Player.
To do this, add a Collided With node.
This node needs a Rigid Body Component, so get the button Entity and, from it, get the Rigid Body Component that we added when configuring the physics.
We also need to tell the node which object we want to detect. For that, add a player tag to the character and pass this tag to Collided With.
This way, the collision will only be considered valid when the button collides with the Player.
With this structure, the button can only be activated when it is inactive and when the Player actually collides with it.
Now that we have both paths defined, let’s first implement the logic for when the button is active.
After that, we will create the behavior responsible for activating it.
To do this, follow the True condition of the If node that checks whether the button is active or not.
In this flow, we will use the Active Time property that we created in the button Entity to control how long the button should remain active.
First, get the button Entity and access its properties through the Get Properties node.
Then use Get Property, connecting the dictionary returned previously and using Active Time as the Key.
Since this property is a Float, change the output type of Get Property to Float, making sure we can use this value correctly in the next part of the logic.
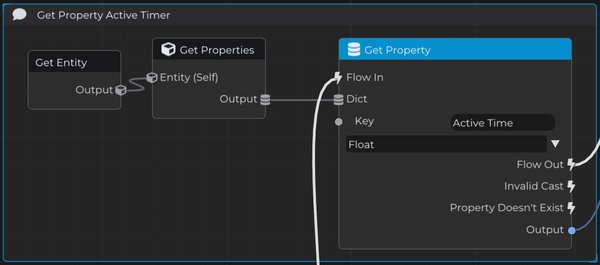
Now the output of Get Property returns the value of the Active Time property, which defines how long the button should remain active.
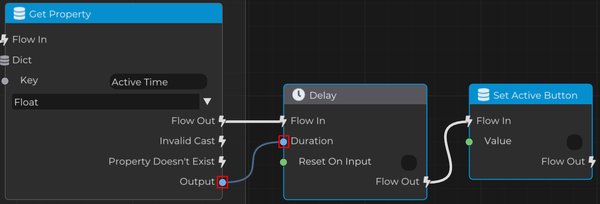
Next, add a Delay node and use this value as the duration.
This way, the waiting time is controlled directly by the Entity property, allowing different buttons to have different activation times without changing the logic.
After the Delay finishes, use Set Active Button and set its value to False.
With this, the button automatically returns to the inactive state after the time specified in its property.
Very good. Now let’s follow the other path and create the behavior responsible for activating the button.
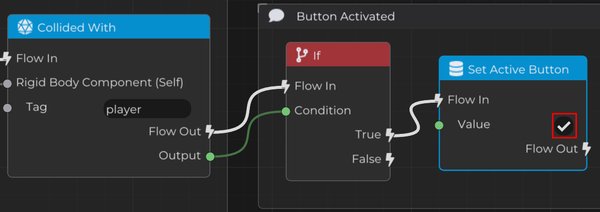
The output of the Collided With node returns a Bool value.
When this value is True, it means the button collided with the Player.
At that moment, we can simply use Set Active Button and set its value to True.
By doing this, the button enters the active state and automatically starts using the active logic we created previously, which keeps it active for a certain amount of time and then deactivates it again.
With this, we created a complete behavior cycle:
- when the Player collides with the button, it is activated
- after the time defined in Active Time, it is deactivated
- after that, it can be activated again by another collision
Even though this logic is simple, it already gives the button two different states and will be the base for the next features we are going to add.
Everything is working, but one important piece is still missing.
Even though the button activation and deactivation logic is already working correctly, our platform still does not know when a button was activated.
This is exactly where the Button Count property that we created previously in the Scene becomes important.
If you remember, in the platform logic we defined that the platform should only be removed when the value of this property becomes equal to the total number of buttons in the map.
In other words, the platform is already ready to react, but so far no button is changing this value.
What we need to do now is allow the buttons to directly modify the Button Count property of the Scene whenever they are activated and deactivated.
This is a great opportunity to practice another very important Logic Bricks feature in Cave: creating functions.
Instead of repeating the same logic multiple times, we will encapsulate this behavior into reusable functions, keeping our Graph more organized, easier to understand, and easier to maintain.
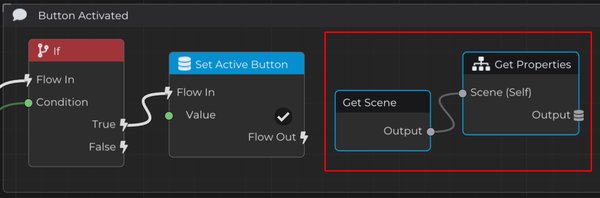
Since the Button Count property is stored in the Scene, we first need to access it.
To do this, get the Scene using Get Scene, and then use Get Properties.
3. Creating the Function that Controls Scene Properties
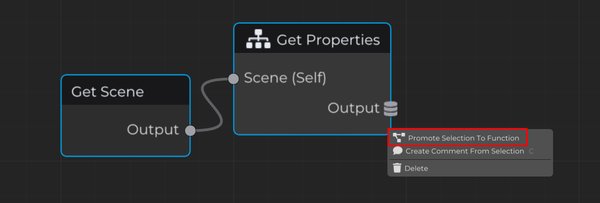
From these nodes, we will create a function.
To do this, select the involved nodes, right-click, and choose Promote Selection to Function.
Then rename the new function to a clear and descriptive name that represents its purpose inside the project logic.
In this case, we will use the name Set Scene Property.
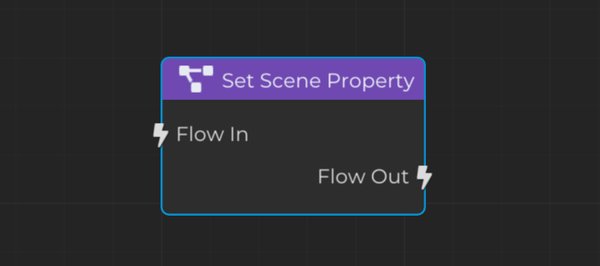
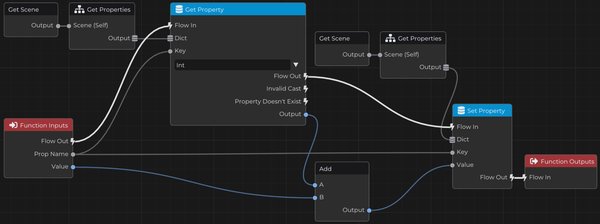
Now let’s structure how the Set Scene Property function will work.
First, pass the Scene properties dictionary to the Get Property node. This dictionary comes from the Get Scene → Get Properties flow.
Then change the output of Get Property to Int, making sure we are working with integer values.
In Function Inputs, create two new parameters for this function:
- Prop Name, of type String
- Value, of type Int
The Prop Name parameter will be used as the Key in Get Property, allowing the function to access the desired property inside the Scene properties dictionary.
Then we will update this property using Set Property.
To do that, get the current value of the property, add the Value input to it, and write the result back into the same property.
We pass the Scene properties dictionary again and use Prop Name as the key.
This creates a generic and reusable function that can modify Scene properties in a simple and organized way.
Instead of only setting an exact value, this function works like an increment system: it adds the received Value to the current value of the Scene property.
With this function ready, we no longer need to keep that entire chain of nodes directly in the main Graph.
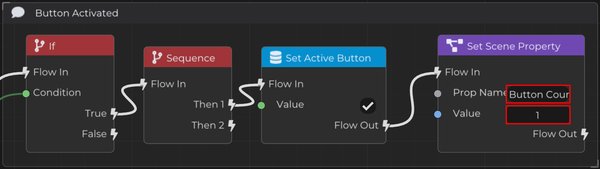
Now, instead of repeating all the logic, we simply call the function right after setting Active Button to True.
This means that at the moment the button is activated, we immediately tell the platform logic that one more button was pressed.
To do this, pass the property name Button Count, which is the property stored in the Scene, and send the value 1 as the increment.
The function will automatically add +1 to the current value of that property.
This way, any activated button directly updates the global progress of the system, without duplicating logic.
It also gives us more flexibility to change Scene properties in the future by reusing this same function.
To show how simple and flexible this is, let’s return to the active button logic.
Right after the activation time finishes and we set Active Button to False, we will call Set Scene Property again.
The Prop Name parameter will be Button Count, using the same Scene property.
But this time, the Value parameter will be -1.
Since our function adds the received value to the current Scene property value, passing a negative number automatically subtracts 1 from the current Button Count.
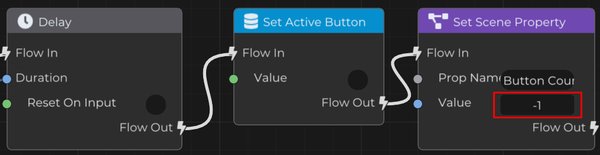
This way, whenever a button is deactivated, the system also correctly updates the global progress, keeping the platform logic synchronized with the real state of the buttons in the map.
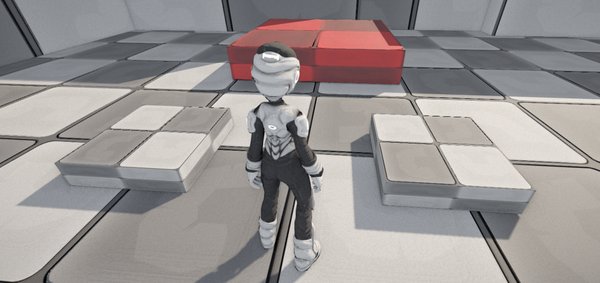
Now our logic is working as expected.
There is only one important detail left: creating a visual effect to make it clear to the player when the button is active.
Whenever a button is activated, we will directly change its color using the Tint, visually highlighting its state.
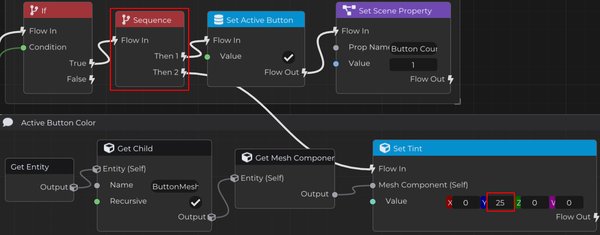
Before setting Active Button to True, add a Sequence.
Since we no longer need three flows, we can remove one of the outputs by right-clicking and selecting Remove Last Flow Output, keeping only two paths.
Then get the child Entity of the button called ButtonMesh, access its Mesh Component, and adjust the Tint value.
In the Y axis, set the value to 25, making the button appear green when activated.
This gives the player clear visual feedback whenever a button is pressed, improving the readability and response of the interaction inside the game.
In the same way, we will restore the original color of the button when it becomes inactive.
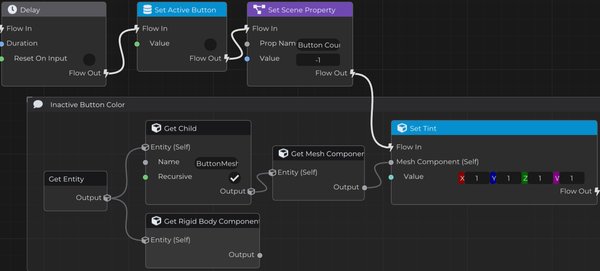
Use the same logic, but in the flow where we set Active Button to False.
At that moment, access the child Entity ButtonMesh again, get its Mesh Component, and adjust the Tint value.
To return to the default color, simply set all Tint values back to 1, restoring the original visual state of the button.
This way, whenever the button is deactivated, it will also return to its initial appearance, making it clear to the player that it can be activated again.
By selecting a button template instance that we added to the scene, we can access its properties and change the value of Active Time.
This way, each button can have a different activation duration and work independently.
This gives us more flexibility to create varied challenges inside the level, since each button can be configured individually without changing the main logic of the system.
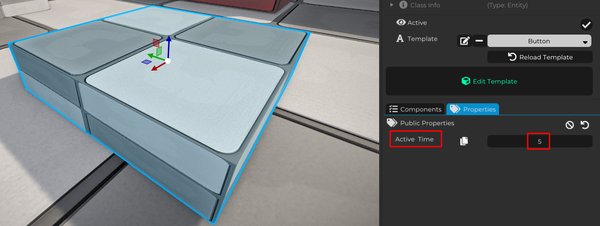
With this, we can add as many buttons as we want to the map, each one with a different activation time and independent behavior.
The platform automatically follows this setup without requiring manual adjustments, because the counting is done at runtime.
The system also remains synchronized with the real state of the game. As buttons are activated and deactivated, the global value is updated, and the platform reacts when the condition is met, being removed from the scene at the correct moment.
In addition to the logic, we added important visual feedback for the player.
Changing the button color when it is activated and restoring its original appearance when it is deactivated makes the system much clearer and more intuitive. The player can visually understand which buttons are active and which ones still need attention.
In the end, we created a modular and scalable system that combines communication between Entities, centralized control through the Scene, and direct visual feedback in the game world.
This same structure can be expanded easily for doors, platforms, elevators, puzzles, traps, timed challenges, and many other interactive events.