Visual Scripting Tutorial (Logic Bricks)
First Steps: Making the Jump Logic for the Player
Lesson 2 of 10 • 20 XP
Keep your place in this quest
Log in or sign up for free to subscribe, follow lesson progress, and access more learning content.
In this lesson, we will start creating the basic movement logic for our Player.
Using only Cave Engine’s Logic Bricks, we will implement a simple jump mechanic through visual logic. This will also help you understand one of the most important ideas behind Logic Bricks: how events, conditions, and actions work together to control gameplay behavior.
In this case, the logic will be very simple:
- Check if the player pressed the jump key.
- Check if the Player is allowed to jump.
- If everything is correct, call the jump function from the Player’s Character Component.
This is a good first example because jumping is a very common gameplay mechanic, but it also introduces the basic structure you will use many times when creating games with Logic Bricks.
1. Adding Jump
To start creating the Player movement logic, we first need to get the game Events.
The Events object gives you access to input-related information, such as keyboard keys, mouse buttons, and other event checks that happen during the game.
Inside the Logic Bricks editing area, right-click to open the node search menu.
To quickly find a node, use the search field identified by the magnifying glass icon and type the name of the node you want.
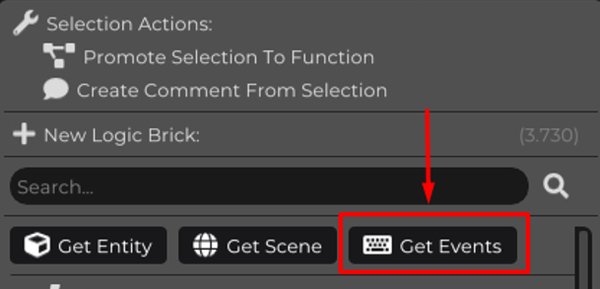
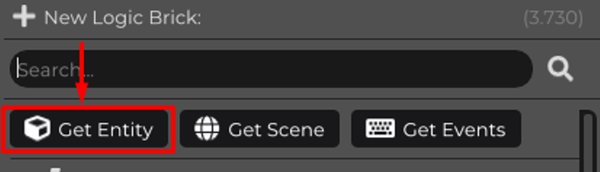
The Entity, Scene, and Events nodes are used very frequently, so they already appear highlighted at the top of the search window. Because of that, you usually do not need to manually search for them by name.
Select Get Events to add an Events node to your logic.
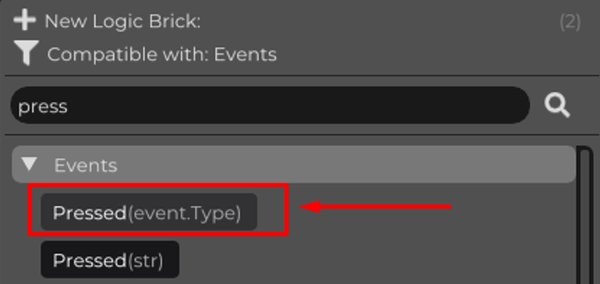
Now add the Pressed node.
This node will be responsible for checking if a specific key is being pressed by the player.
In other words, this is the condition that will tell our logic: “the player wants to jump now.”
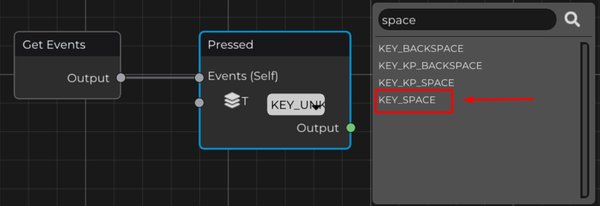
Select the key that will be used to execute the jump.
In most games, the Space key is commonly used for jumping, so we will use it here as well.
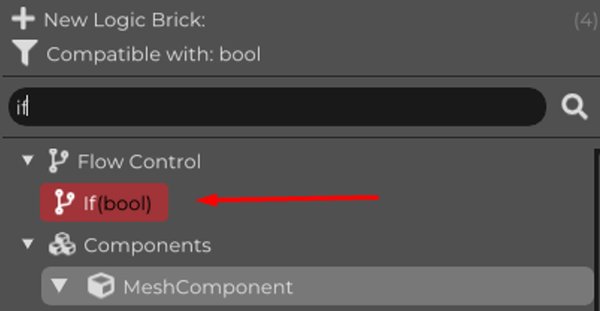
After configuring the jump key, we need to check if this key was actually pressed by the player.
For that, we will use an If (Bool) node.
The If (Bool) node receives a boolean value, which means a value that can be either True or False. If the condition is true, the logic continues through the True output. If the condition is false, it continues through the False output.
In this case, the condition will be whether the Space key is pressed or not.
Now, in the same way that we added the Events node, we also need to get our current Entity.
This is important because the jump action does not belong to the Events object. The Events object only tells us if the key was pressed. The actual jump behavior belongs to the Player Entity, more specifically to its Character Component.
Through the Entity node, we will be able to access the components attached to the Player.
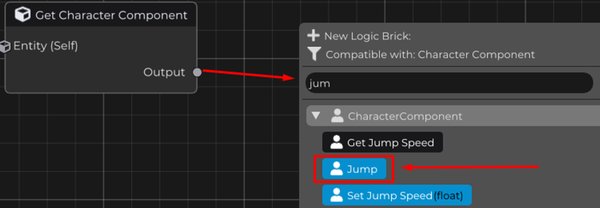
From the Output of the Character Component, drag a connection and search for Jump.
This node will be responsible for executing the character jump when the condition is satisfied.
So, at this point, we are basically saying:
“When the player presses the jump key, get the Player’s Character Component and call its Jump function.”
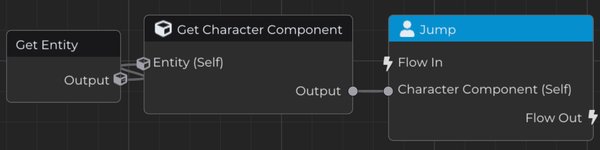
This will be the main flow of the jump logic:
Entity → Character Component → Jump
With this flow, we access the character component from the Entity and then use its jump function.
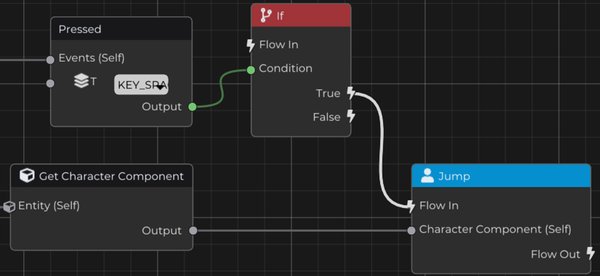
Now connect the True output from the If (Bool) node to the Flow input of the Jump node.
This means that when the Space key is pressed, the condition will be true and the Player will execute the jump.
If the key is not pressed, the condition will be false and nothing will happen.
However, for this logic to actually run, it needs to be connected to a Flow event.
Logic Bricks are not executed randomly. They need an entry point, which is the node that starts the execution flow.
The On Start node runs only once, when the Entity starts. This is useful for initialization logic, such as setting variables, preparing references, or configuring something at the beginning of the game.
The On Update node runs every frame. This is useful for gameplay logic that needs to be checked constantly, such as movement, input, camera control, or anything that can change while the game is running.
Since we need to continuously check if the player pressed the jump key, we will connect our logic to On Update.
This guarantees that the jump key check happens constantly during gameplay.
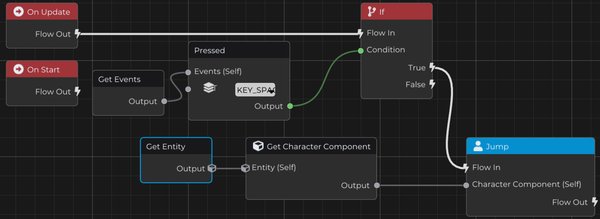
With this logic, the character should already be able to jump.
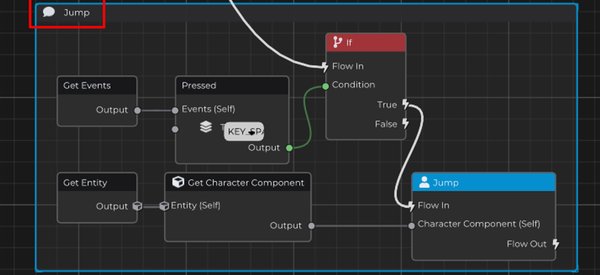
To keep your Logic Bricks organized, you can select all the nodes used to create this functionality by clicking and dragging with the right mouse button, or by selecting them individually while holding Shift.
After selecting the nodes, press C to create a comment.
This is a very useful organization practice. As your logic grows, comments help you visually separate different parts of the behavior, such as jump, movement, camera, attacks, interactions, and so on.
Even if the logic is simple right now, getting used to organizing your nodes early will make your project much easier to understand later.

2. Adding the Ground Check
At this point, you probably noticed a small problem: if we keep pressing the Space key, the character may continue jumping repeatedly.
This happens because our logic still does not verify if the character is actually allowed to jump at that moment. It only checks if the jump key was pressed, and then immediately calls the jump function.
In most games, we do not want the player to jump infinitely in the air. Usually, the player should only be able to jump when touching the ground.
Fortunately, solving this in Cave is very simple.
For that, we will use the On Ground node.
The On Ground node returns a boolean value indicating whether the character is currently touching the ground or not.
So now, instead of checking only one condition, we will check two conditions:
- Is the jump key pressed?
- Is the character on the ground?
Only when both conditions are true, the Jump node should be executed.
The logic becomes:
- First, check if the Space key was pressed.
- If true, check if the Player is on the ground.
- If the Player is on the ground, execute Jump.
- If the Player is not on the ground, do nothing.
This prevents the character from jumping infinitely while already in the air.
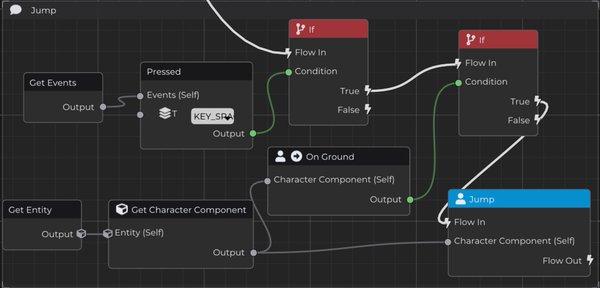
With this ground check added, the jump logic becomes much more correct for a basic player controller.
Now the Player will only jump when the jump key is pressed and the Character Component reports that the Player is currently on the ground. This is the basic structure you will use for many gameplay actions in Cave: first check the input, then check if the action is allowed, and only then execute the action.