Cave: Getting Started Guide
Characters and Animation
Lesson 13 of 19 • 25 XP
Keep your place in this quest
Log in or sign up for free to subscribe, follow lesson progress, and access more learning content.
Now let's understand how characters and animations work in Cave. A character is not just a 3D model walking around the level. In a real game setup, it usually combines physics, movement logic, a visible mesh, an armature, animations, and code or Logic Bricks that decide which animation should play.
To make this practical, we will use the default Player template from Cave's starter projects as the main reference. If you create a Third Person Game or Top Down Game, Cave generates a player that already moves, has a visible animated character, and plays basic locomotion animations.
This lesson will show you how that setup is organized and how you can control animations from Python.
You will learn:
- How the starter
Playertemplate is built. - Why the visual mesh is a child entity instead of being on the root player entity.
- What the Animation Component does.
- How to get the animator from Python (similar logic applies for Logic Bricks).
- How to play animations by name.
- How blending, layers, and bone filters work.
- How animation callbacks and sockets fit into the system.
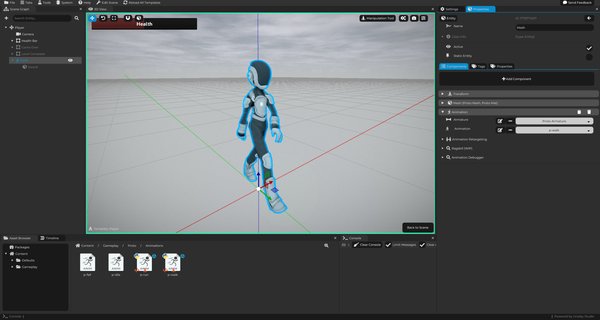
The Player Template Structure
In the starter project, the Player is an Entity Template. This means the player setup is reusable and can be placed in multiple scenes.
The structure is roughly like this:
The exact children can vary depending on the project options you selected, but the important idea is that the root Player entity owns the gameplay setup, while the child Mesh entity owns the visible animated character.
The starter enemy uses a very similar idea. The enemy root entity has character physics and behavior, and its child Mesh entity contains the visible mesh and Animation Component.
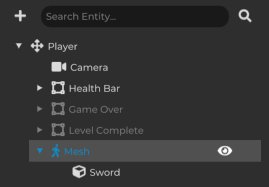
The Root Player Entity
The root Player entity represents the gameplay character. It usually contains:
- A
Transform Component. - A
Character Component. - Python Components for player movement, UI, animation helpers, and other gameplay logic.
- Properties such as health or optional behavior settings.
- Children used for camera, UI, visual mesh, and helper objects.
The Character Component is especially important because it handles character-style physics: walking, jumping, collision, slopes, and movement against the world. This means the root Player is mainly responsible for gameplay and physics.
The Mesh Child Entity
Inside the player template, there is a child entity called Mesh. This child usually contains:
- A
Transform Component. - One or more
Mesh Components. - An
Animation Component.
The Mesh Component gives the character its visible 3D model and material. If the character uses multiple materials, Cave can represent that with multiple Mesh Components, following the same multimaterial rule explained in the importing lesson.
The Animation Component is what evaluates the armature and plays animations.
So, in a simple way:
| Entity | Main Responsibility |
|---|---|
Player |
Physics, movement, gameplay logic, properties. |
Player -> Mesh |
Visible model, material, armature animation. |
This separation is intentional.
Why the Mesh Is a Child Entity
You may wonder why the mesh is not placed directly on the root Player entity.
The reason is that the physics character and the visible animated character often need different transforms.
The root Player transform represents the gameplay body. It is the thing that moves through the world, collides with walls, and carries the Character Component. The child Mesh transform represents how the character looks.
That separation is useful in many situations:
- The mesh may need a different scale than the physics capsule.
- The mesh may need a small offset to align with the character collision.
- The mesh may need to rotate independently from the movement body.
- The mesh may need to face the movement direction while the root keeps a gameplay orientation.
- The mesh may need to stay facing forward while the player moves sideways.
For example, imagine the player is moving left. If you have a proper "walk left" animation, you may want the character mesh to keep facing forward while the animation handles the sideways movement. But if you do not have a sideways animation, you may want the mesh to rotate toward the left so the character visually walks in that direction.
Both cases are valid.
They require separate transforms:
| Transform | Controls |
|---|---|
Root Player transform |
Physics position, gameplay body, movement through the world. |
Child Mesh transform |
Visual orientation, scale, offsets, animation presentation. |
This is why the starter player and enemy keep the animated mesh as a child entity.
What the Animation Component Does
The Animation Component is the main component used to play skeletal animations on an entity.
It needs:
- An
Armature. - A default
Animation. - A valid Mesh Component on the same entity (or multiple ones).
The armature defines the skeleton. The animation defines how that skeleton moves over time. The Animation Component evaluates the final animated pose and applies it to the visible character.
In the default starter player, the Mesh child uses:
Proto MeshProto MatProto Armaturep-idleas the default animation (idle animation)
Those starter assets are there so you can immediately inspect a working animated character.
Armatures, Animations, and Retargeting
- An
Armatureis the skeleton of the character. It contains the bones that the mesh follows. - An
Animationstores motion over time for bones in an armature.
The Animation Component connects those pieces together:
| Piece | Meaning |
|---|---|
| Mesh | The visible character model. |
| Armature | The skeleton inside the character. |
| Animation | The motion, such as idle, walk, run, or fall. |
| Animation Component | The component that plays the animation on the entity. |
Cave can also retarget animations when possible. If the animation being played belongs to a different compatible armature, the Animation Component can use retargeting to apply that motion to the current armature.
Retargeting is useful when you want to reuse animations across compatible characters, but it still depends on the quality and compatibility of the imported rigs. If an animation looks twisted, offset, or strange, check the source rig, the imported armature, and the retargeting setup.
Getting the Animator From Python
Now let's start exploring how we can animate characters through logic.
In Cave projects, it is common practice to keep the player gameplay logic on the root Player entity, then access the Mesh child from that code. The default starter scripts follow this idea.
Here is the basic pattern:
import cave

class PlayerAnimationExample(cave.Component):
    def start(self, scene: cave.Scene):
        self.mesh : cave.Entity = self.entity.getChild("Mesh")
        self.animator : cave.AnimationComponent = self.mesh.get("Animation")

    def update(self):
        # Example: playing an idle animation.
        self.animator.playByName("p-idle", blend=0.2, loop=True)
In this example:
self.entityis the rootPlayerentity.getChild("Mesh")finds the visual child entity.self.mesh.get("Animation")gets the Animation Component.- The variable is called
animator, which is the common naming practice in Cave scripts. playByName(...)plays an animation asset by name.
This is the basic connection you need before controlling animations through code.
Playing Animations by Name
The most common method you will use is playByName.
Its basic usage looks like this:
self.animator.playByName("p-walk", blend=0.2, loop=True)
The important parameters are:
| Parameter | Meaning |
|---|---|
anim |
The name of the animation asset to play. |
blend |
How long, in seconds, Cave should blend into the new animation. |
loop |
Whether the animation should repeat. |
layer |
Which animation layer should play the animation. |
For example:
self.animator.playByName("p-idle", blend=0.2, loop=True)
self.animator.playByName("p-walk", blend=0.2, loop=True)
self.animator.playByName("p-run", blend=0.2, loop=True)
self.animator.playByName("p-fall", blend=0.2, loop=True)
These are the same kind of calls used by the default player and enemy scripts.
A Simple Locomotion Example
A common player animation setup is:
- Play idle when the character is standing.
- Play walk when the character moves.
- Play run when the character moves while running.
- Play fall when the character is not on the ground.
Here is a simplified example:
import cave

class SimplePlayerAnimator(cave.Component):
    def start(self, scene: cave.Scene):
        self.character : cave.CharacterComponent = self.entity.get("Character")

        self.mesh : cave.Entity = self.entity.getChild("Mesh")
        self.meshTransform : cave.TransformComponent = self.mesh.getTransform() if self.mesh else None
        self.animator      : cave.AnimationComponent = self.mesh.get("Animation") if self.mesh else None

    def update(self):
        if self.animator is None or self.character is None:
            return

        direction = self.character.getWalkDirection()
        isMoving = direction.length() > 0
        isRunning = False # Replace this with your own input or gameplay condition.

        if self.character.onGround():
            if isMoving:
                if isRunning:
                    self.animator.playByName("p-run", blend=0.2, loop=True)
                else:
                    self.animator.playByName("p-walk", blend=0.2, loop=True)
            else:
                self.animator.playByName("p-idle", blend=0.2, loop=True)
        else:
            self.animator.playByName("p-fall", blend=0.2, loop=True)
This example is intentionally simple. The real starter controller also handles input, movement direction, jumping, optional point-and-click behavior, and mesh rotation, but the animation idea is the same.
Rotating the Mesh Toward Movement
Because the visual Mesh entity has its own transform, you can rotate it separately from the root Player.
The starter player does this when the character moves:
if direction.length() > 0 and self.meshTransform:
    self.meshTransform.lookAtSmooth(
        self.entity.getTransform().transformDirection(-direction),
        6.0 * cave.getDeltaTime()
    )
The important idea is not the exact math. The important idea is that the gameplay body and the visual mesh can be controlled separately.
This allows you to choose how the character should face:
- Face the movement direction.
- Keep facing forward while strafing.
- Smoothly rotate toward the desired direction.
- Use different visual orientation rules for different gameplay modes.
This is one of the main reasons the starter character has a child Mesh entity.
Animation Blending
Animation blending makes transitions smoother.
Without blending, switching from one animation to another can snap instantly. With blending, Cave can smoothly transition between animations on the same layer.
For example:
# From this:
self.animator.playByName("p-idle", blend=0.2, loop=True)

# To this:
self.animator.playByName("p-walk", blend=0.2, loop=True)
Here, blend=0.2 means Cave will blend into the new animation over 0.2 seconds.
This is especially important for characters. A player can notice harsh animation pops very easily, even in a prototype.
Good beginner blend values are usually small:
0.1for very quick transitions.0.2for normal locomotion transitions.0.4or more for slower, heavier transitions.
You should tune this by feel.
Animation Layers
Cave supports multiple animation layers. Each layer can play its own animation, and higher layers can be stacked on top of lower layers. You can run animations in any layer you want.
The default locomotion animation usually runs on layer 0.
For example:
self.animator.playByName("p-walk", blend=0.2, layer=0, loop=True)
If you have an upper-body action animation, such as an attack, aim, or reload, you can play it on another layer:
self.animator.playByName("Attack", blend=0.1, layer=1, loop=False)
The idea is:
| Layer | Common Purpose |
|---|---|
| Layer 0 | Full-body locomotion, such as idle, walk, run, jump, fall. |
| Layer 1 | Upper-body actions, such as attack, aim, reload, hold weapon. |
This allows the character to keep walking while another layer adds an action on top.
Layer Weights
Each layer has a weight, which controls how much influence that layer has.
You can change it from Python:
self.animator.setLayerWeight(1, 1.0)
You can also read it:
weight = self.animator.getLayerWeight(1)
A weight of 1.0 means the layer is fully active. A weight of 0.0 means it has no visible influence.
Layer weights are useful when you want to fade an action layer in or out, such as slowly raising a weapon, aiming, or blending into a special stance.
It's worth mentioning that the blend parameter only blends animation between the same layers. And we're not gonna blend animations being played at different layers. So if you have an animation played at layer 0, and then all of a sudden you play an animation on layer 1, no matter what the blend value it is, it won't blend between them. It will only blend if there was already another animation being executed on layer 1. If you want to blend between layers, you need to make a custom logic to use the layer weight in order to do that.
Bone Filters
Bone filters control which bones are affected by a layer and how much influence each bone receives.
This is what makes upper-body animation possible.
For example, you may want:
- Layer 0 to control the whole body.
- Layer 1 to control only the spine, arms, hands, and weapon bones.
In Python, you can create a filter for a layer and assign influence to a bone and its children:
def setupUpperBodyLayer(self):
    armature = self.animator.armature.get()
    spine = armature.getBone("mixamorig:Spine")

    upperBody = self.animator.createLayerFilter(1)
    upperBody.defaultBlend = 0.0
    upperBody.setToBone(spine, 1.0, recursive=True)
In this example:
defaultBlend = 0.0means the layer affects no bones by default.setToBone(spine, 1.0, recursive=True)means the spine and its children are affected fully.- Layer
1can now be used for upper-body animations.
Your bone names depend on the armature you imported. Always inspect your armature and use the correct bone names for your character.
Practical Layer Example
Imagine a third-person character that can walk and attack at the same time.
One possible setup is:
| Layer | What It Handles |
|---|---|
| Layer 0 | Idle, walk, run, fall. |
| Layer 1 | Upper-body attack. |
The code could look like this:
import cave

class CombatAnimator(cave.Component):
    def start(self, scene: cave.Scene):
        self.mesh = self.entity.getChild("Mesh")
        self.animator : cave.AnimationComponent = self.mesh.get("Animation") if self.mesh else None

        if self.animator:
            armature = self.animator.armature.get()
            spine = armature.getBone("mixamorig:Spine")

            upperBody = self.animator.createLayerFilter(1)
            upperBody.defaultBlend = 0.0
            upperBody.setToBone(spine, 1.0, recursive=True)
            self.animator.setLayerWeight(1, 1.0)

    def playWalk(self):
        self.animator.playByName("p-walk", blend=0.2, layer=0, loop=True)

    def playAttack(self):
        self.animator.playByName("Attack", blend=0.1, layer=1, loop=False)
This example assumes you have an animation asset called Attack. If your project uses a different animation name, use that name instead.
The important idea is that locomotion stays on layer 0, while the attack plays on layer 1 and affects only the filtered bones.
Animation Callbacks
Animations can run Python code at specific times.
Cave supports callbacks such as:
- On animation start.
- On animation end.
- On a specific animation frame.
Callbacks are useful when animation should trigger gameplay or effects.
Examples:
- Play a footstep sound.
- Spawn dust on a step.
- Apply damage on an attack frame.
- Start a weapon trail.
- Trigger a particle effect.
- Notify logic that an animation finished.
Animations often know the exact timing better than code does. If a sword should deal damage only when the swing reaches the target area, an animation callback can place that gameplay moment on the correct frame.
Footstep Callback Example
Starter projects can include footstep callbacks in walk and run animations. Inspecting those is a good way to see a practical animation callback in action.
The idea is simple:
- The animation knows when the foot touches the ground.
- The callback is placed on that frame.
- The callback plays a sound or spawns a small effect.
Inside an animation callback, Cave provides useful variables such as:
entity, the owning entity.animator, the Animation Component.handle, the animation layer/handler being played.
A very small footstep callback could look like this:
cave.playSound("Footstep Grass", volume=0.5)
You can later expand this idea to choose different sounds depending on the ground material, character speed, or current state.
Reusable Animation Callbacks
Callbacks belong to the animation asset.
That means if multiple entities play the same animation, the callback can run for each entity that uses it.
This makes callbacks reusable. For example, the same walk animation can trigger footstep sounds for every character that plays it, as long as the callback code uses the owning entity correctly.
The animation stores the timing. The entity provides the context.
Advanced Pose Callbacks
Cave also supports post-evaluation callbacks through Python. These happen after the Animation Component evaluates the armature pose.
This is an advanced feature, but it can be used for:
- Inverse kinematics.
- Head aiming.
- Weapon aiming.
- Foot placement.
- Final pose adjustments.
The starter Player Toolkit includes a Foot IK example that uses this concept. It gets the Mesh child, gets the Animation component, then registers a method with:
self.animator.addPostEvaluationCallback(self.postEvaluation)
You do not need to write IK systems right away, but it is useful to know that Cave lets Python adjust the final pose after normal animation playback.
Animation Socket Component
The Animation Socket Component lets a child entity follow a bone from a parent animated entity.
The child entity must be under a parent that has an Animation Component. Then the socket can choose a bone and copy position, rotation, and optionally scale from that bone, with offsets if needed.
Sockets are useful for attaching things to animated characters:
- Sword in a hand.
- Gun in a hand.
- Shield on an arm.
- Helmet on a head.
- Backpack on a spine bone.
- Prop attached to a hand.
For example, if a character holds a sword, the sword can be a child entity with an Animation Socket Component that follows the hand bone. As the character attacks, runs, or idles, the sword stays attached to the correct animated position.
What You Should Remember
- The starter player is a template with a root
Playerentity and a childMeshentity. - The root
Playerusually handles physics, movement, properties, and gameplay logic. - The child
Meshusually handles the visible model, material, armature, and Animation Component. - This separation gives the physics body and visual character separate transforms.
- The Animation Component plays skeletal animations using an armature and animation assets.
- In Python, it is common to call the Animation Component
animator. playByNameplays an animation asset by name and supports blending, looping, and layers.- Layers let multiple animations stack together.
- Bone filters let a layer affect only part of the skeleton.
- Animation callbacks connect animation timing to gameplay events.
- Animation sockets attach props to animated bones.
When you inspect the starter Player or Enemy template, use this structure as your map: root entity for gameplay, child Mesh entity for visuals and animation.