Cave: Getting Started Guide
Entity Templates
Lesson 11 of 19 • 10 XP
Keep your place in this quest
Log in or sign up for free to subscribe, follow lesson progress, and access more learning content.
Entity Templates are Cave's reusable entity system.
They let you build an entity setup once, save it as an asset, and place instances of it across scenes.
If you come from another engine, you can think of Entity Templates as Cave's prefab-like workflow. If you are new to game engines, think of them as reusable object recipes.
Instead of rebuilding the same door, enemy, pickup, or UI widget every time, you create the setup once and reuse it wherever you need it.
What Are Entity Templates?
An Entity Template is an asset that stores an entity structure.
It can include:
- A root entity (every Template MUST have one and only one Root Entity).
- Child entities.
- Components.
- Component settings.
- Asset references.
- Properties.
- Tags.
When you place a template in a scene, Cave creates an instance of that template.
The instance uses the template asset as its base, which means it can keep the same internal structure while still existing as a placed object in a specific scene.
Why Entity Templates Matter
Many game objects are not just one mesh.
A pickup might include:
- A visible model.
- A trigger.
- A light.
- A particle effect.
- A sound.
- Logic that gives the reward.
A template lets you keep that whole setup together.
Use Entity Templates for things like:
- Player characters.
- Enemies.
- Pickups.
- Doors.
- Bullets.
- Vehicles.
- Portals.
- Damage volumes.
- Props.
- UI pieces.
- Reusable gameplay objects.
Templates save time, but they also keep repeated objects consistent. If every health pickup comes from the same template, you can improve the template once and keep the project organized.
Creating an Entity Template
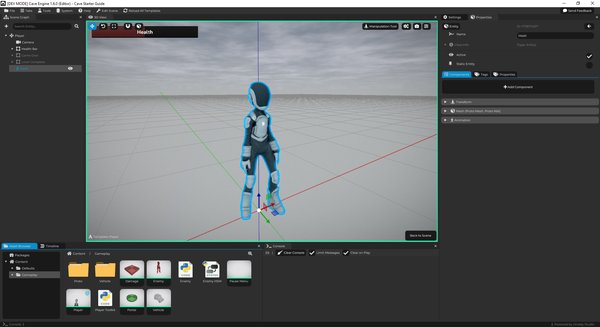
You can create an Entity Template from the Asset Browser, or you can promote an existing scene entity into a template by right clicking it in the Scene Graph or pressing Ctrl + T to promote the selected one.
A common workflow is to build the object directly in a scene first, test it, and only turn it into a template once the setup is useful. It looks like this:
- Build an entity in a scene.
- Add the components and children it needs.
- Tune its settings.
- Promote it to an Entity Template.
- Reuse that template in the same scene or other scenes.
But as soon as you are sure that you will reuse such thing, like the player, enemies, power-ups, etc., it is a good practice to immediately create it, either in the asset browser or by promoting it as suggested before.
In the Scene Graph, the quick edit menu can promote an entity to a template. The shortcut shown by the editor is Ctrl + T.
Template Asset vs Template Instance
It helps to separate the template asset from the placed instance.
| Concept | Meaning |
|---|---|
| Template asset | The reusable object setup stored in the Asset Browser. |
| Template instance | A placed copy of that template inside a scene. |
The asset defines the reusable structure.
The instance is where that reusable structure appears in a specific scene.
Editing an Entity Template
Templates are edited as their own asset.
When you open a template for editing, Cave switches to a template editing scene so you can edit the template's internal entity structure directly.
The important idea is:
> The template owns its internal hierarchy.
Scene instances use that hierarchy, but they do not directly own every child inside it. This keeps all instances connected to the same reusable setup.
It's worth mentioning that this becomes false once the game starts, because when you start the game, all the hierarchy of the template is immediately available for you to customize. So while programming your game logic, you can expect to be able to interact with entity template instance, children, etc.
For example, if you open an Enemy template and add a new Health Bar child inside it, every instance of that enemy template can benefit from the updated structure.
Why Template Children Are Not Edited Directly in the Scene
When a template instance is placed in a scene, the internal children still belong to the template. That is why Cave protects template children from direct scene editing.
For example, if an enemy template contains:
Enemy
  Body Mesh
  Detection Area
  Health Bar
You should edit those internal children inside the template, not as separate scene-owned objects.
This keeps every instance consistent. If every placed enemy could freely edit its internal children, the template would stop being a reliable reusable object.
Instantiating a Template in a Scene
After a template exists, you can place it in a scene.
For example, you can drag a template from the Asset Browser into the 3D View.
When the template is placed:
- It appears in the Scene Graph as a template instance.
- Cave uses a different template color (green) for the instance.
- The instance keeps its connection to the template asset.

From a workflow point of view, this is one of the fastest ways to build levels. You create a reusable door, pickup, enemy, or prop once, then place instances wherever the level needs them.
Local Template Customization
Template instances can still be customized locally:
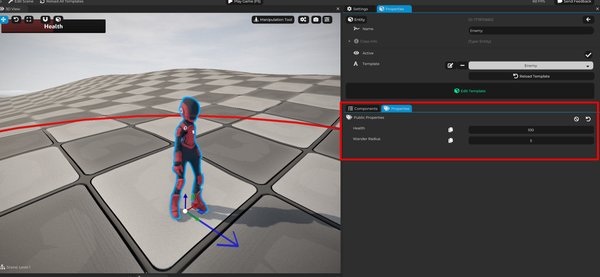
The main way to do that is through properties exposed by the root template entity.
This gives you a useful balance:
- The structure stays reusable.
- Each placed instance can have its own values.
For example, multiple enemies can use the same enemy template, while each instance has different health, speed, patrol settings, or behavior options.
Examples of Local Template Properties
Useful local properties include:
| Property | Example Use |
|---|---|
| Enemy health | Make one enemy weaker or stronger. |
| Enemy speed | Create slow and fast variants. |
| Damage amount | Reuse one hazard setup with different danger levels. |
| Portal target level | Send each portal to a different scene. |
| Pickup value | Make coins, gems, or rewards worth different amounts. |
| Door locked state | Reuse one door setup for locked and unlocked doors. |
| UI text | Reuse one UI widget with different labels. |
For example, one Portal template can be used in many places if each placed portal has a local property that chooses the target scene.
Starter Project Template Examples
Starter projects can include several useful templates depending on the project options you selected.
You may find examples such as:
- Player template.
- Enemy template.
- Damage template.
- Portal template.
- Vehicle template.
- Reusable gameplay pieces.
These are worth inspecting. Open them, look at the hierarchy, inspect the components, and see which properties are exposed.
The generated content is not only there to be used. It is also there to teach you how real Cave objects can be built.
Good Use Cases for Entity Templates
Create a template when an object is:
- Repeated many times.
- Used across multiple scenes.
- Built from multiple components.
- Built from multiple child entities.
- Meant to behave consistently.
- Useful as a reusable gameplay piece.
Good candidates include:
- Enemies.
- NPCs.
- Weapons.
- Bullets.
- Collectibles.
- Doors.
- Checkpoints.
- Traps.
- Level portals.
- Vehicles.
- Destructible props.
- UI widgets.
- Reusable level design pieces.
The more often you reuse an object, the more valuable a template becomes.
When Not to Use a Template
Not everything needs to be a template.
A unique object that appears once and only makes sense in one scene can stay as a normal scene entity.
For example:
- A one-off cinematic prop.
- A special level-specific trigger.
- A unique decoration that will never be reused.
- A temporary test object.
Templates are powerful, but they are most useful when reuse actually matters. Turning every tiny object into a template too early can make the project harder to manage, not easier.
A Simple Template Rule
If you catch yourself copying the same entity setup more than once, consider making it an Entity Template.
That one habit can save a lot of time and keep your project much cleaner as it grows. making it an Entity Template.