Visual Scripting Tutorial (Logic Bricks)
First Steps: Making the Basic Player Movement
Lesson 3 of 10 • 20 XP
Keep your place in this quest
Log in or sign up for free to subscribe, follow lesson progress, and access more learning content.
In this lesson, we will continue developing the basic movement logic for our Player.
Using Cave Engine’s Logic Bricks, we will create the logic responsible for making the character walk and run. Along the way, you will learn how to capture player input, convert that input into a movement direction, control movement speed, and keep the visual logic organized.
This lesson builds on the jump logic created previously. Now, instead of only reacting to a single key press, we will read multiple keys at the same time and use them to define where the Player should move.
1. Adding Sequence
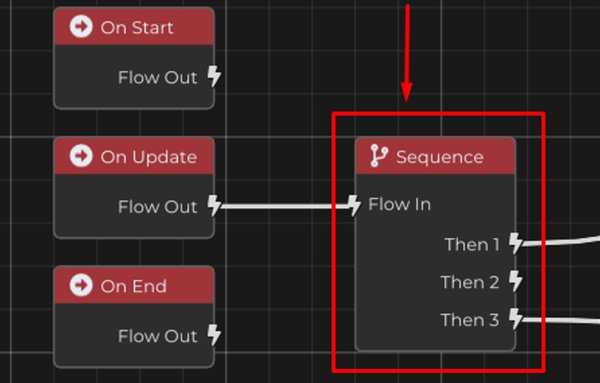
To continue developing the movement logic for our Player, we will learn how to use the Sequence node.
The Sequence node allows you to create multiple Flow outputs from a single input. This is useful because many gameplay systems need to run more than one piece of logic from the same event.
For example, our On Update event needs to check the jump logic every frame, but it will also need to check the movement logic every frame. Instead of creating everything in one large and confusing chain, we can use Sequence to split the flow into multiple organized branches.
This way, the same On Update event can execute different blocks of logic every frame in a cleaner and more controlled way.
2. Creating the Movement Logic
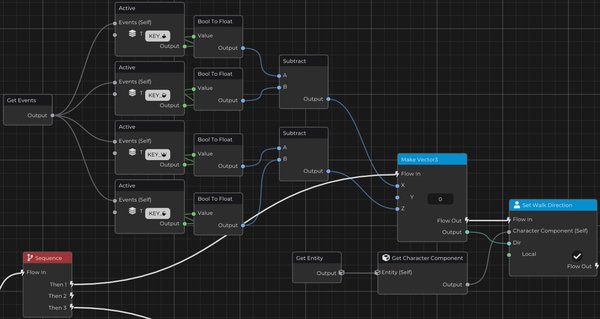
To create the Player movement, we will start by adding the Events node and then the Active node.
The Active node checks if a key is currently being held down. This is different from checking if a key was pressed only once. For movement, we usually want to know if the player is continuously holding the key, because the character should keep moving while the key remains active.
We will do this for all movement keys:
- W to move forward
- S to move backward
- A to move left
- D to move right
The output of the Active node is a Bool value. A boolean variable can only have two states: True or False.
When we convert this boolean value to a Float using the Bool To Float node, we get:
- 1 when the value is True
- 0 when the value is False
This allows us to use the keyboard state in mathematical operations.
For example, we can subtract the value of S from the value of W to calculate the forward/backward movement. We can also subtract the value of A from the value of D to calculate the left/right movement.
This works because each key returns either 0 or 1.
For example, for forward and backward movement:
- If W is pressed and S is not pressed, the result is
1 - 0 = 1, so the Player moves forward. - If S is pressed and W is not pressed, the result is
0 - 1 = -1, so the Player moves backward. - If neither key is pressed, the result is
0 - 0 = 0, so there is no movement on that axis. - If both keys are pressed, the result is
1 - 1 = 0, so they cancel each other.
With these results, we add a Make Vector 3 node and connect the calculated values to the X and Z axes, which will be responsible for defining the movement direction.
Now connect the first Then output of the Sequence node to the flow of this movement logic, while the other Then output can continue being used by the jump logic created in the previous lesson.
Finally, get the Entity, access its Character Component, and use the Set Walk Direction node. Connect the vector created by Make Vector 3 to the direction parameter, so the Character Component knows where the Player should move.
Now we need to create a limiter to control the movement speed of our Player.
Instead of defining the movement direction directly in Set Walk Direction, we will first store the movement direction in a property. This gives us more control because we will be able to modify this direction before applying it to the character.
Open the Properties tab, create a new property, change its type to Vector3, and rename it to Move Dir.
This property will be used to store the Player movement direction and will serve as the base for the next adjustments in the logic.

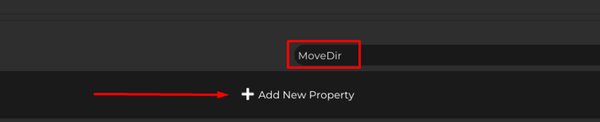
Click the gear icon displayed next to the property and select Change Type to change its type.
Then choose Vector3.


Now go back to the Graph of your Logic Bricks and set the Move Dir property that we just created.
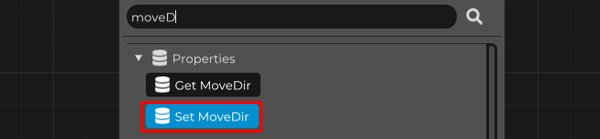
Connect the output of the Make Vector 3 node to the value of the Move Dir property.
This means that, instead of applying the movement direction directly to the character, we are storing that vector in a property so we can use and modify it in the next parts of the logic.
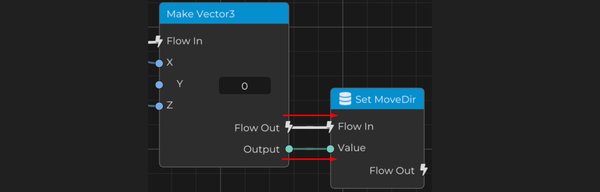
Now that we are storing the character movement direction in the Move Dir property, let’s create two more properties of type Float:
- Walk Speed
- Run Speed
These properties will define the Player speed in each movement state.
Using properties here is a good practice because it makes the movement easier to adjust later. Instead of searching for hardcoded values inside the graph, you can simply select the Entity and tweak the walking and running speed directly from the Properties tab.

Now create one more property, this time of type Bool, called Is Running.
This property will store the running state of the character. It will tell the logic whether the Player is currently running or not, allowing us to choose between the Walk Speed and Run Speed values.

Now add an Active node to check if the Shift key is being held down.
Then use Set Is Running to define the property based on this condition. When Shift is active, Is Running should be set to True, indicating that the character is running.
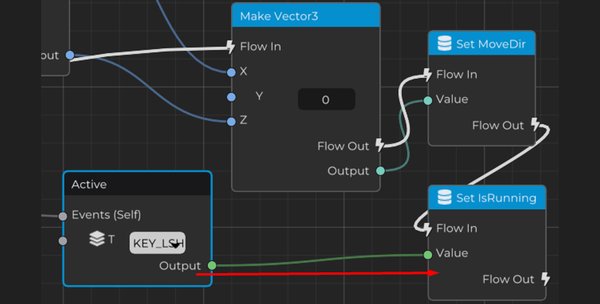
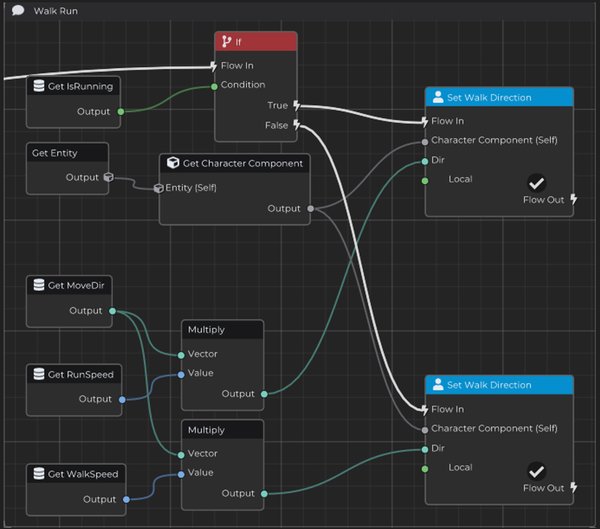
Now we will define the Walk Direction using the direction stored in the Move Dir property, while also applying the correct speed for each movement state.
To do this, add an If node that checks whether the Is Running property is True or False.
If the result is True, get the value of Move Dir and multiply it by the Run Speed property.
If the result is False, get the value of Move Dir and multiply it by the Walk Speed property.
Finally, connect the result of this multiplication to the Set Walk Direction node.
This way, the movement direction stays the same, but its intensity changes depending on whether the Player is walking or running.
Now we need to solve a small problem.
If you move the character diagonally, you may notice that it moves faster than when walking only forward, backward, left, or right. This happens because combining two movement axes creates a vector with a larger magnitude.
For example, moving only forward creates a direction like this:
(0, 0, 1)
But moving forward and right at the same time creates something like this:
(1, 0, 1)
That diagonal vector is longer than a single-axis vector, which makes the character move faster diagonally.
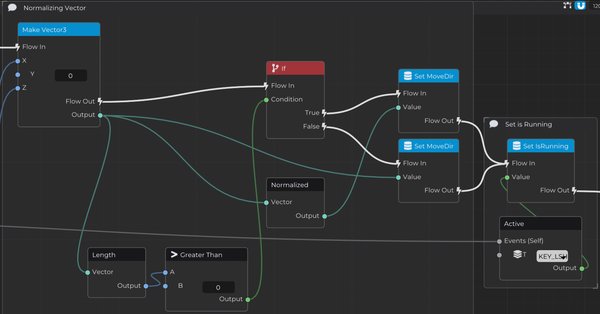
To fix this behavior, we will normalize the direction vector before storing it in the Move Dir property.
First, get the Length of the vector generated by Make Vector 3.
Then add an If node to check if this value is greater than 0.
This verification is important because we should not normalize an empty vector. A vector with length 0 means that no movement key is being pressed, so there is no direction to normalize.
If the condition is true, use the Normalized node to get the normalized version of the vector.
Otherwise, use the original vector.
Finally, connect the result to the Set Property node of Move Dir.
This preserves the movement direction, but keeps its magnitude consistent, making sure the character moves at the same speed in every direction.
3. Using Events
There are more organized ways to structure the flow of our logic inside Logic Bricks.
Besides comments and the Sequence node, we can also use Events to make the system cleaner and easier to understand.
Events allow you to separate a specific block of logic and call it from another place in the graph. This is especially useful as your graph grows, because it avoids having everything directly connected to On Update in one large chain.
Now let’s create a new event called Move Player.
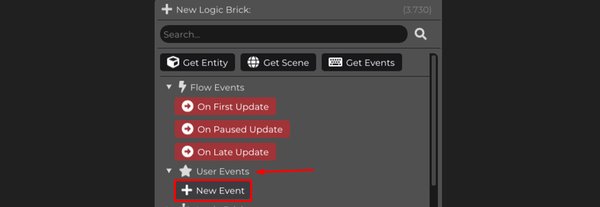
Then connect this event to the flow of the Player movement logic block.
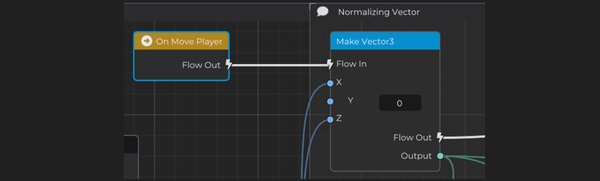
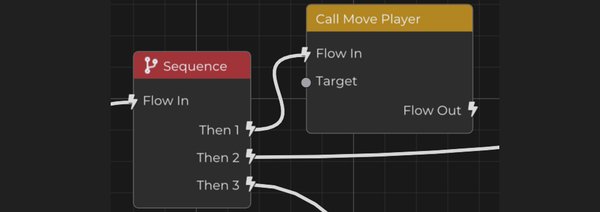
With this, instead of keeping the entire movement logic directly connected to On Update, we can simply call the Move Player event inside the On Update sequence.
This makes the flow cleaner, more modular, and easier to understand, especially as the project logic becomes more complex.
At this point, the Player already has a basic movement system created with Logic Bricks.
The logic now checks the movement keys, calculates a movement direction, normalizes the direction to avoid faster diagonal movement, stores it in the Move Dir property, checks if the Player is running, applies the correct speed, and finally sends the result to the Character Component through Set Walk Direction.