Visual Scripting Tutorial (Logic Bricks)
First Steps: Playing the Character Animations
Lesson 4 of 10 • 15 XP
Keep your place in this quest
Log in or sign up for free to subscribe, follow lesson progress, and access more learning content.
In this lesson, we will start integrating animations into our Player logic.
At this point, the Player can already move and jump. Now we need to make the character visually react to those states by playing the correct animations, such as idle, walking, running, and falling.
The main idea is simple: we will use the current state of the character to decide which animation should be played.
For example:
- If the Player is on the ground and not moving, play the idle animation.
- If the Player is on the ground and moving, play the walking animation.
- If the Player is running, play the running animation.
- If the Player is not on the ground, play the falling animation.
This is one of the most common patterns when creating a character controller. The movement logic controls what the character is doing, and the animation logic reads that information to decide what the player should see.
1. Creating the Animation Execution Logic
Now that we learned how to create and organize events, let’s create a new event for the animation logic block called Update Animations.
This event will be responsible for updating the animation state of the Player.
The first thing we will do is connect this event to an If node that checks whether the character is currently on the ground or not. This information will be used to decide which animation should be played.
For example, when the Player is on the ground, we can play idle, walk, or run animations. When the Player is not on the ground, we can play a falling animation instead.
Next, we need to access the Animation Component, which is responsible for managing and playing the character animations.
To do this, we first get the Entity, then use the Child node to get the child object named Mesh, which is the mesh object of our Player. From this child Entity, we can access the Animation Component.
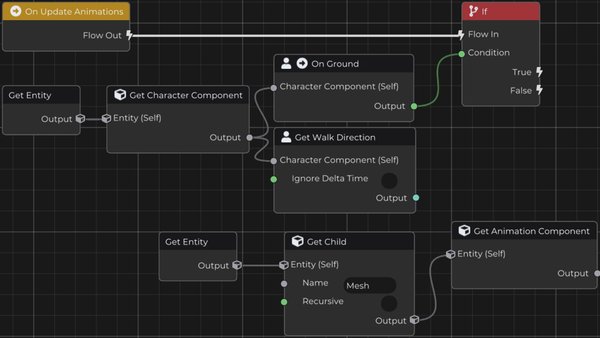
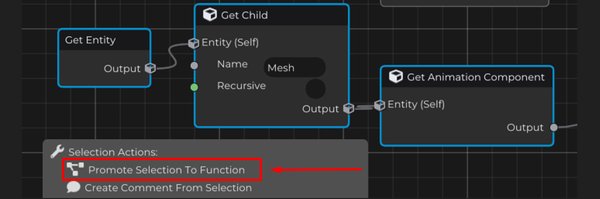
Since we will probably need to access the Animation Component multiple times, we can turn the Get Entity, Get Child, and Get Animation Component nodes into a reusable function.
To do this, select the nodes you want, right-click, and choose Promote Selection To Function.
This will create a function containing this logic, making the Graph cleaner and easier to understand. It also allows us to reuse this same flow in other parts of the Logic Brick without having to recreate the same nodes again.
Let’s rename this function to Play Animation.
Using clear and descriptive names is very important when working with visual logic. As your graph grows, good names will help you quickly understand what each event, function, and block of logic is responsible for.
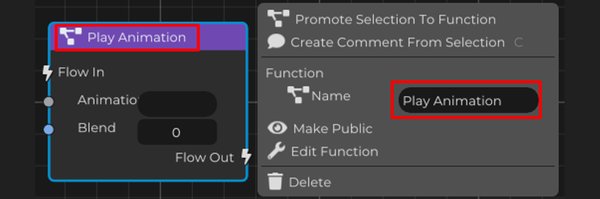
Now double-click the Play Animation function to open and edit it.
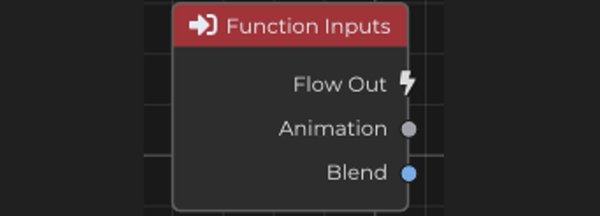
Then right-click on the Function Inputs node and add two new input pins.
The first input will be:
- Animation, of type String.
This input will be used to inform the name of the animation that should be played.

The second input will be:
- Blend, of type Float.
This input will be used to control the transition time between animations.
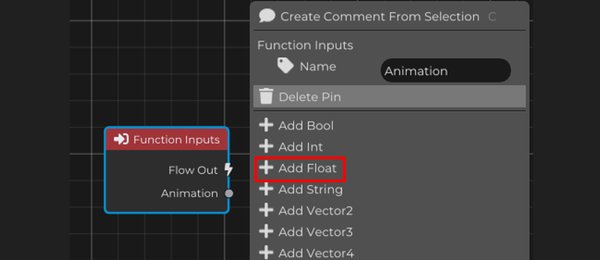
These parameters make the function much more flexible.
Instead of creating a different block of nodes for each animation, we can use the same Play Animation function and simply pass a different animation name and blend value every time we call it.
From the output of Get Animation Component, add the Play By Name node.
This node is responsible for playing an animation based on its name.
Then connect the Animation and Blend parameters that we created in the Function Inputs node to the corresponding fields of the Play By Name node.
This means that every time the Play Animation function is called, it will receive the animation name and the blend time, then pass those values to Play By Name.
Do not forget to enable the Loop option in the Play By Name node.
With Loop enabled, the animation will continue playing while it is active, instead of stopping when it reaches the last frame. This is especially important for animations like idle, walking, running, and falling, because they usually need to keep playing continuously.
Finally, connect the output Flow of the Play By Name node to Function Outputs, finishing the execution of the Play Animation function.
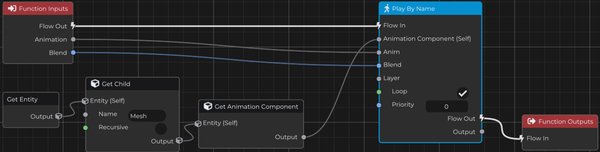
Now it is much easier to play the animations of our character.
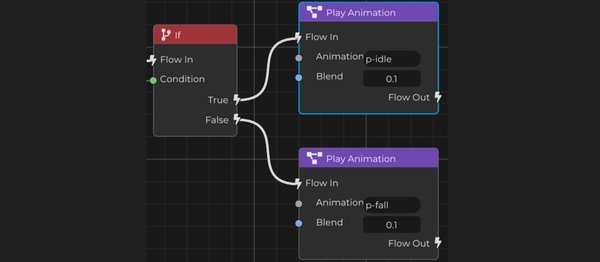
Go back to the If node that checks whether the Player is on the ground or not, and use the Play Animation function.
When the condition is True, meaning that the Player is on the ground, call the function passing "p-idle" as the animation parameter. This is the animation used when the character is standing still.
When the condition is False, meaning that the Player is not on the ground, call the function passing "p-fall". This is the animation used when the character is in the air.
For both cases, use 0.1 as the Blend value. This gives the animation a small transition time, making the change smoother instead of instantly snapping from one animation to another.
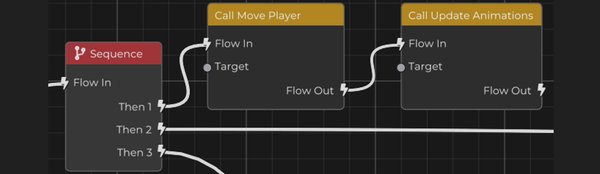
Now we only need to call the Update Animations event inside the flow of the Move Player event.
This way, every time the Player movement logic is updated, the animation logic will also be updated.
With this, the Player will already be able to switch between p-idle and p-fall depending on its current state. When the Player is on the ground, it will play the idle animation. When the Player is in the air, it will play the falling animation.
Perfect. Now let’s continue developing the Player animation logic by adding the movement animations.
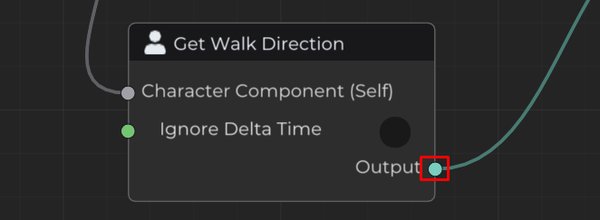
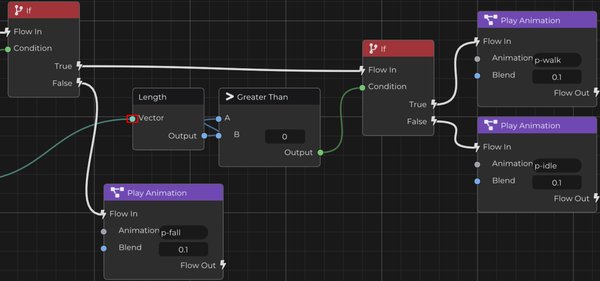
To do this, get the Walk Direction and use the Length node to measure the intensity of the movement vector.
The length of the movement vector tells us whether the character is moving or not.
Then add an If node to check if this value is greater than 0.
If the result is True, it means the character is moving, so we can play the walking animation p-walk.
If the result is False, it means the character is not moving, so we should play the idle animation p-idle.
This makes the Player automatically switch between standing still and walking based on its movement.
Now there are two more details to complete the movement animation behavior of our character:
First, we need to play the running animation when the Player is running.
Second, we need to make the Player look in the direction it is moving.
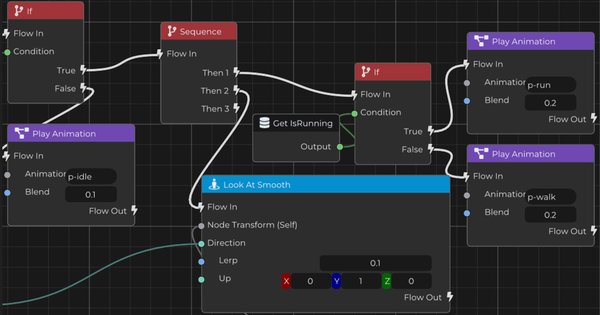
To control the walking and running animations, add a Sequence node right after the check that verifies if the Player is moving.
Then get the Is Running property and use an If node to check its value.
If Is Running is True, play the running animation.
If Is Running is False, play the walking animation.
This way, the Player will not only know whether it is moving or stopped, but also whether it should use the walking or running animation while moving.
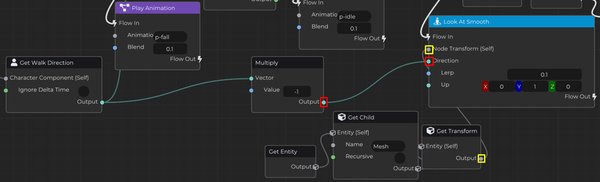
On the second Then output of the sequence we just added, use the Look At Smooth node.
This node will rotate the character smoothly, making it look in the direction it is moving. This makes the movement feel much more natural, because the character mesh will visually face the same direction as the movement.
We need to multiply the Get Walk Direction value by -1 before sending it to Look At Smooth.
This inverts the direction vector and corrects the direction that the character mesh is facing. Depending on how the character model was imported or oriented, the visual mesh may face the opposite direction of the movement vector. Multiplying by -1 fixes this and makes the character face the correct direction while moving.
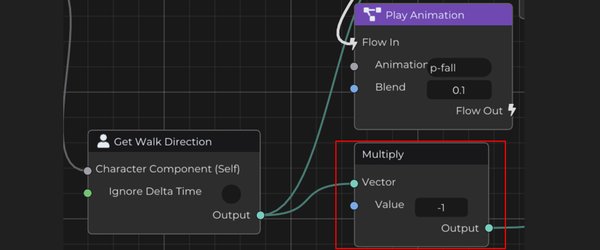
After that, connect the already multiplied direction to the Look At Smooth node.
Next, we also need to provide the Transform of the object that will be rotated.
To do this, access the Entity, then get the Player Mesh, and use the Get Transform node.
This transform should be connected to Look At Smooth, making sure the rotation is applied to the correct object, which is the visible mesh of the character.
At this point, the Player animation logic is already much more complete.
The character can now switch between idle, falling, walking, and running animations based on its current state. It also smoothly rotates to face the direction of movement, making the controller feel more natural and visually connected to the gameplay logic.