Visual Scripting Tutorial (Logic Bricks)
Creating a Button Activated Platform
Lesson 8 of 10 • 10 XP
Keep your place in this quest
Log in or sign up for free to subscribe, follow lesson progress, and access more learning content.
In this lesson, we will explore a new way to activate events inside the game.
Instead of using collectable items, we will create a system based on buttons that need to be activated by the player in order to release a platform or execute another action.
This example is a little more advanced, and it will help us practice several concepts learned so far, such as communication between Entities, use of properties, tags, and organization of visual logic.
In this first part, we will create the platform logic and learn how to use properties stored directly in the Scene.
This is very useful when you need to share information between different Entities in the game. Instead of storing data only inside one Entity, the Scene can work as a centralized place where multiple systems can read and modify the same information.
In this example, the buttons will increase a value stored in the Scene, and the platform will read that same value to know when all buttons were activated.
1. Creating the Platform
First, just like we learned in the previous lessons, let’s create a new Entity Template for our platform.
Configure the Mesh that will be used as the visual representation of the platform according to the style and needs of your project.
Then add and configure the collision, so the Player can interact with the platform correctly inside the scene.
In this example, the platform will not need any specific Tag or Property, because the activation logic will be controlled by the other elements of the system that we will create in the next steps.
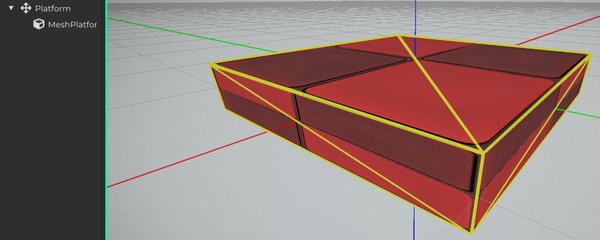
2. Creating the Platform Logic
Now let’s create a new Logic Brick and link it to our platform Entity.
Inside this Logic Brick, we will develop the logic responsible for controlling the platform behavior and its interaction with the rest of the system.
You can add this Logic Brick directly to the Entity or configure it through the platform Template, the same way we did in the previous lessons.
Since this platform is likely something you may want to reuse, configuring it through the Template is usually a good option.
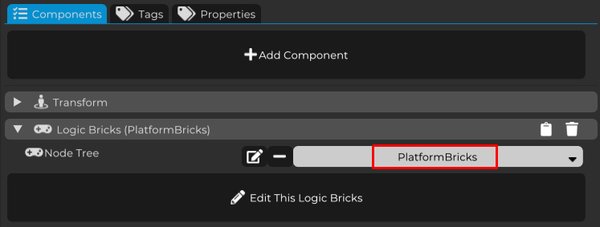
First, let’s create two properties.
The first one will be added to the platform Logic Brick. It should be an Int property called Buttons.
This property will later store the total number of buttons available in the map.
With this value, the platform will be able to know how many buttons exist and compare that number with how many buttons were already activated by the player.

The second property will be created directly in the Scene, so we can easily access it from different parts of the game logic.
To do this, in the 3D View, click the sky/background of the scene to select the Scene itself.
Then, in the Properties panel, you should see that the selected object type is Scene, along with the name of the current scene.
This property will be used later to store and share global information.
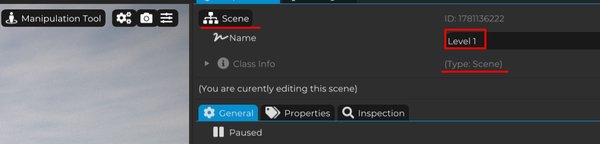
Click the Properties tab of the Scene and create a new property called Button Count.
This property will make more sense when we create the buttons, because the buttons will be responsible for changing its value whenever they are activated by the player.
Even so, we can already create it now, because it will also be used soon by the platform logic.
In short:
- Buttons belongs to the platform and stores how many buttons exist.
- Button Count belongs to the Scene and stores how many buttons were already activated.
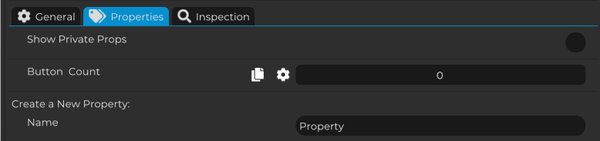
Now that we created the two properties, one in the Scene and one in the platform Logic Brick, let’s start developing the platform logic.
Return to the Graph.
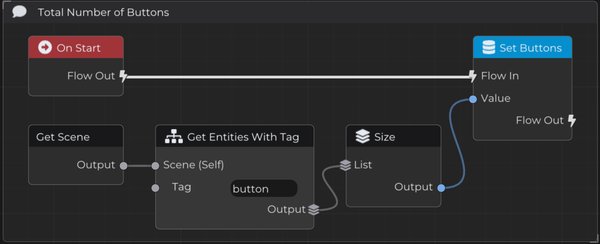
The first information we need is the total number of buttons that exist in the map.
Since this value only needs to be calculated once when the game starts, we will execute this logic through On Start.
First, get the Scene and use the node that searches for all Entities with the tag button.
We have not created the buttons yet, but we can already prepare this logic because we will add this tag to them later.
Then use the Size node to get the number of Entities found in that list.
This value represents the total number of buttons present in the scene.
Finally, store this result in the platform’s Buttons property using Set Buttons.
Now let’s create the logic responsible for activating the platform action after all buttons have been pressed.
In this example, we will remove the platform from the scene, but you can adapt this logic to do anything you want, such as moving the platform, playing an animation, opening a passage, enabling another object, or triggering a cutscene.
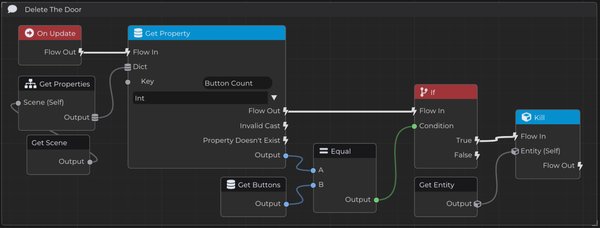
For this check, we will use On Update, making sure the condition is verified continuously while the game is running.
First, get the Scene and access its properties.
Since we previously created the Button Count property in the Scene, we can access it through the Get Properties node, which returns a dictionary containing all properties of the Scene.
Then connect this dictionary to the Get Property node and inform the name Button Count to retrieve exactly the property we created in the Scene.
By default, the output of Get Property is of type Any.
Since we need to compare this value with the platform’s Buttons property, which is an integer number, change the output type of Get Property to Int.
Then compare this value with the Buttons property from the platform, which stores the total number of buttons available in the map.
If both values are equal, it means that all buttons were activated by the player.
At this moment, we can execute the desired action.
In this example, we will remove the platform Entity from the scene.
Perfect. The logic of our platform is now ready.
The platform is already able to automatically identify, when the game starts, how many buttons exist in the map.
This gives us freedom to add or remove buttons from the scene without having to manually change any value, because the logic will recalculate the amount every time the game starts.
With this, the platform can dynamically determine when all buttons were activated by comparing the total number of buttons with the value stored in the Button Count Scene property.
We also prepared the entire structure for the next step, including the use of the button tag, which will be added to the buttons later.
This means the communication between the elements is already planned:
- the platform counts how many buttons exist
- each button will update the Scene property when activated
- the platform checks the Scene property
- when the count matches the total, the platform executes its action
Now we are ready to move to the next step: creating the buttons and developing the logic that connects them to the platform, completing the interaction between these two systems.