Cave : Guide de démarrage
Creating a New Project
Lesson 2 of 19 • 20 XP
Keep your place in this quest
Log in or sign up for free to subscribe, follow lesson progress, and access more learning content.
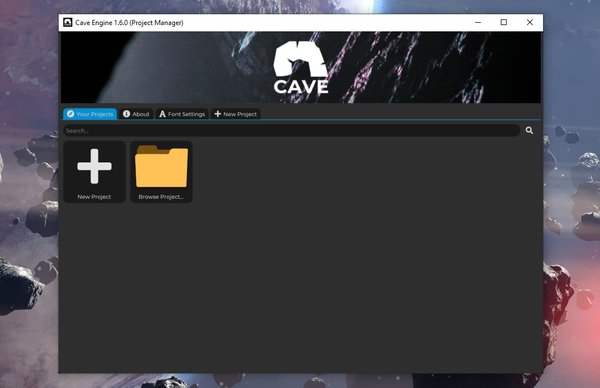
The Project Manager is the first place you see after launching Cave Engine. It is where you create new projects, reopen recent projects, and locate projects that are already on your computer.
In this lesson, you will create your first project and understand what the project setup options actually do.
The Project Manager
The main Project Manager tab is called Your Projects.
At the beginning of the list, you will always find two important thumbnails:
New Project: starts the new project setup.Browse Project...: lets you select an existing Cave project folder from disk.
Below those, Cave shows the projects it already knows about. Project thumbnails are sorted by their last write time, so recently edited projects are easier to find.
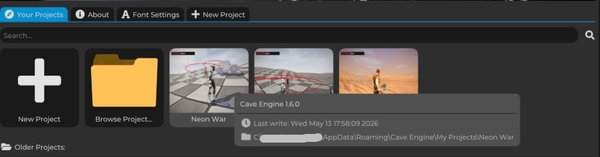
Hover a project thumbnail to see useful information, such as:
- The Cave Engine version used by the project.
- The last write date.
- The project path on disk.
- Compatibility warnings, if the project cannot be opened safely by the current engine version.
Right-click a project thumbnail to see project actions:
Open Project: opens the project if it is valid and compatible.Reveal Project in Explorer: opens the project folder on disk.Remove from Project Manager: removes the project from the list without deleting the project folder.Delete Project: permanently deletes the project folder.
Be careful with Delete Project. It removes the files from disk and cannot be undone from Cave.
Older and Invalid Projects
Cave separates projects into a few groups.
Current projects are projects made with the current engine version.
Older projects are compatible projects made with an older version of Cave. Cave can open them, but it will warn you first because saving the project in a newer version may migrate the project data. Make a backup before opening an important old project.
Invalid projects are folders that are not valid Cave projects, or projects that are not compatible with the current engine version.
A normal Cave project folder contains a Source folder and a Source/Content folder. If you use Browse Project..., select the project folder itself, not a random folder inside it.
Adjusting the Editor Zoom
If the interface looks too small or too large, hold Ctrl and scroll the mouse wheel.
You can also open the Font Settings tab in the Project Manager and adjust Editor Interface Scale. This is useful for high-DPI monitors, laptops, large displays, or screen recording.
Cave saves your editor scale preference, so you do not need to adjust it every time.
Opening an Existing Project
To open a recent project, click its thumbnail in Your Projects.
To open a project that is not listed, click Browse Project... and select the project's main folder. If the selected folder does not look like a Cave project, Cave will show an invalid path message.
If you only want to remove a project from the Project Manager list, right-click it and choose Remove from Project Manager. This does not delete the project from disk.
Creating a New Project
Click New Project to open the project creation screen.
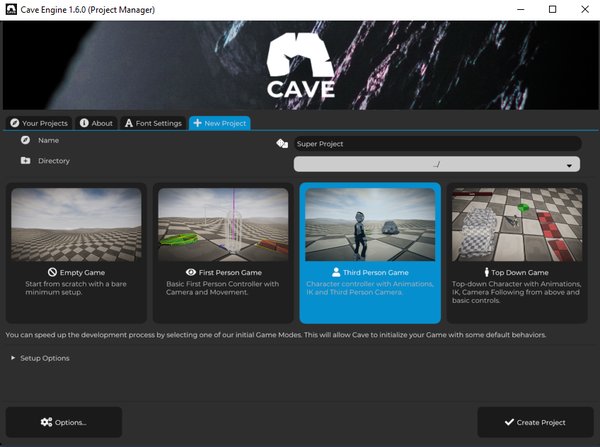
The first things you choose are:
Name: the name of your project.Directory: where the project folder will be created.Game Mode: the starter template for the project.
Cave creates a new folder using your project name. If you leave the directory at the default location, Cave uses its editor data folder:
Windows: %AppData%\Cave Engine\My Projects\
Linux:   ~/Cave Engine/My Projects/
For your first project, use a simple name and keep the default directory unless you already have a specific project folder structure you prefer.
Setup Options
The first setup page also includes a Setup Options section.
Create .gitignorecreates a recommended.gitignorefile for version control. Keep this enabled if you plan to use Git.Create AGENTS.mdcreates project guidance for AI coding tools, along with Cave's helper CLI file. This is useful if you plan to ask an AI assistant to help write Cave Python scripts or inspect your project structure.
You can leave both options enabled for a normal project.
Choosing a Project Template
Cave currently offers four starter game modes.
| Template | Best for | What it creates |
|---|---|---|
Empty Game |
Starting from scratch | A minimal project with default assets and a basic level. |
First Person Game |
FPS-style prototypes | A player with first-person camera and movement. |
Third Person Game |
Character action, adventure, platforming, exploration | A player character with animations, foot IK, and third-person camera. |
Top Down Game |
Top-down action, RPG, tactics, arena games | A top-down animated character with camera and movement setup. |
| --- |
If you are brand new and just want to see Cave working quickly, choose Third Person Game or First Person Game.
If you already have a solid understand of the engine and want to create every piece manually, choose Empty Game. Just keep in mind that it won't include any of Cave's quality of life starter assets.
If you already know your game should use an overhead camera, choose Top Down Game.
Project Options
Click Options... if you want to customize the starter content before creating the project.
For non-empty templates, the Base Game section includes:
Health Bar Color: changes the color of the generated player health bar.Procedural Sky: creates a procedural sky texture for the starter levels.Default Skybox: used instead of the procedural sky if procedural sky is disabled.Num Levels: creates multiple starter scenes namedLevel 1,Level 2, and so on.
For Top Down Game, there is also a Point and Click option. When enabled, the player can move by clicking a position in the world.
Extra Starter Content
The Extras section controls optional gameplay pieces.
Add Terrain (in the Levels)creates levels with terrain. If disabled, Cave uses a simple plane as the ground.Portal Templatecreates a reusable portal that sends the player to another level when touched. In generated levels, Cave places portals between levels and fills the portal'ssceneproperty with the next level name.Damage Templatecreates a simple red placeholder object that damages the player when touched.Vehicle Templateimports the default vehicle assets and creates a physics-ready vehicle template.Add Enemiescreates a starter enemy template and places a few enemy instances in each generated level.
These options are there to save time. You can delete, replace, or expand the generated content later.
Starter Enemies
When Add Enemies is enabled, Cave creates an Enemy Entity Template, an Enemy Python script, and an Enemy HSM state machine asset.
The default enemy is intentionally simple:
- It has a
healthproperty. - It has a
wanderRadiusproperty. - It uses the Proto character mesh tinted red.
- It uses a Character Component for movement and collision.
- It uses a small State Machine for behavior.
The starter State Machine has a Wander state with child states that randomly choose between waiting and moving to a random reachable position. It also includes a simple Flee state that can run when the enemy loses health.
This is not meant to be a final enemy AI. It is a working example you can inspect, play with, and replace as your game grows.
Menus and Interface Setup
The Menus section can generate common game UI pieces.
Main Menu (Scene)creates aMain Menuscene and sets it as the initial scene for the game. The generated main menu includes buttons to play the game, open credits, and quit.Pause Menu (Template)creates a reusable pause system as an Entity Template and adds it to each generated level. By default, it lets the player pressEscapeto pause, continue, restart, return to the main menu when one exists, or quit the game.
Non-empty game templates also create gameplay UI attached to the player, including a health bar, a game-over menu, and a level-complete menu.
The Interface section controls the look of the generated UI:
- Button style:
Flat ShadedorGradient. - Text color.
- Base button color.
- Hovered button color.
- Pressed button color.
The Initial Fonts section chooses the regular and bold fonts for the generated UI. If you leave them unchanged, Cave uses its default Public Sans fonts.
The Credits section lets you write the text that appears in the generated credits screen.
Creating the Project
When you are ready, click Create Project.
Cave will create the project folder, generate the selected assets, save the project, and open the editor.
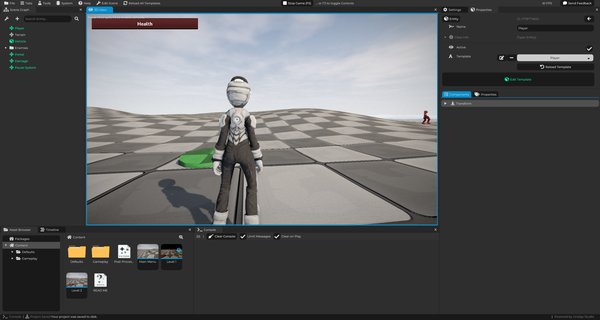
Depending on your options, your new project may include:
- A
Defaultsfolder with default materials, meshes, textures, fonts, UI style, skybox, and post-processing. - A
Gameplayfolder with templates and scripts such asPlayer,Pause Menu,Portal,Damage,Vehicle,Enemy, andEnemy HSM. - One or more level scenes.
- A
Main Menuscene, if enabled. - A
READ MEdocumentation asset explaining what was generated.
Do not worry if this feels like a lot at first. The starter content is there so you can open the project, press play later, and immediately have something real to inspect.
What Comes Next
After the project opens, you will be inside the main Cave Editor.
In the next lesson, you will learn the editor layout: the 3D View, Scene Graph, Properties tab, Asset Browser, Console, Settings tab, Timeline, and the other tabs you will use while building your game.