Cave: Getting Started Guide
Importing Assets
Lesson 12 of 19 • 50 XP
Keep your place in this quest
Log in or sign up for free to subscribe, follow lesson progress, and access more learning content.
Cave is a Game Engine, meaning that it allows you to turn your ideas into actual video games. It's means for you to put everything together, create your level designs, interfaces and logic. But for the actual art creation, such as textures, 3d models, animations, sounds and music, you may prefer to user a specialized tool for that. Tools such as Blender, 3Ds Max, Maya, Sketchup for 3D, Adobe Photoshop, GIMP, Krita for image manipulation or Audacity for sound. Of course, you can use any other external tool for this matter. What's important here is:
Most games use content made outside the engine.
That's not different in Cave. This means that you'll need to import those files into the engine, so it's essencial for you to understand how and what are the good and bad practices. Importing is the step that brings those files into Cave so they can become part of your project.
This lesson introduces the beginner import workflow.
You will learn:
- What kinds of files Cave can import.
- What imported files become inside Cave.
- Why simple first imports are better than huge asset packs.
- How model imports can generate several asset types.
- What to check after importing.
The goal is to help you understand what happens when external files become Cave assets.
What Can Be Imported?
Cave can import several kinds of external content.
| Imported File Type | Becomes |
|---|---|
| Images (various formats) | Texture assets. |
| OGG audio | Audio assets. |
| TTF fonts | Font assets. |
.cavePkg files |
Imported Cave asset packages. |
| 3D models | Meshes, materials, textures, armatures, animations, and templates depending on the file. |
After import, those files become Cave assets in the Asset Browser.
That means they can be used in Scenes, Materials, Entities and Entity Templates, UI, Audio Systems, Scripts, Logic, everywhere! Imported files are not just loose files on disk anymore. They become project content that Cave can reference, save, organize, and reuse.
Cave uses its own Formats
When importing ANY file into cave (images, textures, audios 3D models, etc), the asset is converted into Cave Engine's proprietary and custom format. That's important because this internal format is much faster to parse and to be user by the engine to deliver the best performance possible to your game. Lots of internal optimizations and caching are automatically performed by the engine to make sure your assets are ready for game production.
> All that is internal and you don't need to worry about it, but it's essencial for you to understand that this process happen and how it affects you (and why it's good).
If you import a .png image file into Cave, it won't use the actual png file in your final game. It goes through a quick conversion process as soon as you drop it into the engine, then Cave's format is used instead. The same thing occurs when you import an audio or a 3D model. That information is specially important for 3D assets as well: Cave does not use raw DCC formats such as .fbx, .obj, .glb. It can import them, but they're converted into the engine's format.
The reason why this happens is because although those formats are popular, parsing something like an fbx or even a png in a game is costly and may affect the performance. So Cave extracts all the necessary data, such as Meshes, Materials, Animations, Textures, then convert and stores them into the engine's format.
This has three important implications:
- Your game will run faster and weight less on disk.
- Asset importing is destructive: Cave don't keep an original reference of your RAW asset, so if you made an external change to it, you'll have to import it again.
- Some features may not be available: While some asset formats are supported, some features in this format may not be supported by cave. In this case, you'll ne notified and the importing process won't include them into the final assets.
Now that you're aware of the importing process, let's learn about it.
Importing Images by Drag and Drop
You can import images by dragging them into the Asset Browser.
Cave supports most common image formats such as:
- PNG.
- JPG and JPEG.
- TGA.
- BMP.
- HDR.
- PSD.
- PNM.
- GIF.
- PIC.
- DDS.
Imported images become Texture Assets and can be used by materials, UI elements, sky settings, and other systems that need image data. For example, a texture might become the color map of a rock material, an icon in the UI, or a skybox image for a scene.
For a first test, keep it simple: import one texture, assign it to a material, place that material on a mesh that's in the Scene, and check the result in the 3D View.
Importing Audio Files
Audio can also be imported by dragging it into the project. Currently, Cave imports OGG audio files. If you have audio in another format, convert it to OGG before importing. You can find online tools for this conversion, but we also recommend the software Audacity, that's free and extremely easy to understand and save the audio into ogg.
An OGG file is a free, open-source multimedia container format developed by the Xiph.Org Foundation. It is primarily used to stream and store high-quality digital audio, often achieving better sound quality at smaller file sizes than traditional MP3s. ref
Imported audio becomes an audio asset that can be used anywhere in the engine, for example by Audio Player Components, logic bricks or called through Python code. Example:
cave.playSound("My Audio File")
Good first audio imports are short and easy to test:
- A coin pickup.
- A button click.
- A door opening.
- A simple ambience loop.
- A music for you Game's soundtrack.
Importing Fonts and Cave Packages
Cave can import TTF font files. TTF (TrueType Font) is a font file format originally developed by Apple and later adopted by Microsoft, becoming one of the standard formats used today for scalable digital text rendering.
Fonts are mainly used by the UI Element Component, allowing you to create Game HUD, text, menus, buttons, subtitles, credits, dialogue interfaces, etc. Font choice can make a big difference, even in a simple menu.
Importing Cave Packages
Cave can also import .cavePkg files. A Cave package is a package of Cave assets that can be brought into another project.
If you go to the Asset Browser and right-click a folder or a file, you'll be able to export it as a cave package. When exporting a package, you will be able to import this later on into other projects. That's very useful to share common logic across your different projects. Keep in mind that when exporting a package, only what's inside the folder or asset you right-click it will be included. So if you want to export, for example, a material that uses a set of textures, it's important to put everything together into a folder and then export the folder. Otherwise, if you only import the material, the textures won't be included.
When you drag and drop a cave package into CaveEngine's Asset Browser, it will be imported and the original file structure exported will be recreated into your existing project. Very useful, again, to share reusable assets, bring default content into a new project, or moving project pieces between different projects.
Importing 3D Models
Now we reached one of the most important parts of a 3D game engine, which is importing 3D models. Cave uses assimp to support importing a wide range of 3D models formats through its model importer.
It supports multiple model formats through the importer, but FBX is the main recommended format for Cave.
Model imports can generate several asset types at once:
- Meshes.
- Materials.
- Textures.
- Armatures.
- Animations.
- Entity Templates.
The exact result depends on the original file.
A simple crate may only generate a mesh, material, texture, and template. An animated character may generate meshes, an armature, animations, materials, textures, and a more complex template.
Recommended First Imports
For your first import tests, use simple, clean assets. Kenney Asset Packs (CC0) are a good beginner-friendly choice because they are usually well organized, lightweight, and easy to understand. You can also check Quaternius Assets (CC0) or browser FAB Asset Store.
Good first imports can be a crate, a rock, low-poly tree, simple building or character. Avoid starting with a giant character pack or a huge environment file. Simple assets make it easier to understand what Cave creates, which settings matter, and how imported content appears in the Asset Browser. Then you can move to more complex setups.
Importing a Model Step by Step
When dragging and dropping an asset (such as FBX) into Cave's Asset Browser, you will see a window like this:
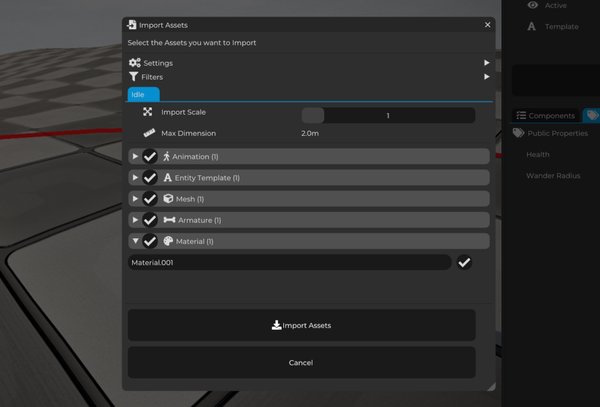
It supports dragging and dropping multiple files at once, and a tab per file will be created. For each tab, you will be able to select the assets you want to import. This will also show you what asset types, and if you expand each asset type header, what assets got recognized and converted by Cave Importer. It will also allow you to individually select what you want to import or not, and rename the files accordingly. You can change the imported asset names later as well.
On top, before each file tab, you will find two global options (per asset import):
- The Settings, that allows you to select if you want to create a subfolder for the imported asset or not, or if you want to generate physics automatically in the entity template that will be generated by the engine.
- And also the Filters options, that are useful when you are importing dozens of assets and nodes, and you only care about a specific thing in the file, such as the mesh.
A basic model import usually looks like this:
- Create or choose a folder in the Asset Browser.
- Drag the model file into that folder.
- Wait for Cave to parse the file.
- Review the import options.
- Choose which generated assets should be imported.
- Adjust import scale if needed.
- Confirm the import.
- Inspect the generated assets in the Asset Browser.
The import options can show generated assets grouped by type.
This lets you decide what should be imported instead of blindly accepting everything. That is useful because model files can contain more data than you actually need.
IMPORTANT TIP:
If you are downloading hundreds of assets or an asset pack, such as Kenney or Quaternius asset pack, you will notice that those packs will usually have one different FBX file per object, and inside each FBX file, there is a copy of the material and sometimes even the texture that will be used across all those assets.
If you drag and drop all those assets containing a copy of the same material on each file, Cave will, as expected, also import all the copies, generating a bunch of unnecessary data into your project and eventually making your game performance inefficient. That's not an engine fault, it's simply because there is a copy of the materials on each FBX file.
The best practice in this case is to first import one single FBX file into the engine, looking what is inside this file, confirm the material in it. Once this first file is imported and the material is in your project, you import all the others, using the filters to disable the material and texture importing, since it is already imported by the engine for your first file. Then, when you hit import, Cave will actually try to locate this already imported material by name and use it instead.
Understanding Imported Meshes
An imported model can generate one mesh or many meshes. This depends on how the model was built in the original DCC tool.
For example:
| Source Model | Possible Import Result |
|---|---|
| Simple crate | One mesh, one Material, one Entity Template. |
| Object with separate parts | Multiple meshes and Materials, one Entity Template. |
| Animated character | Meshes, Armature, and animations, one Entity Template. |
After import, inspect the generated mesh assets and the generated Entity Template.
Notice that for every import, an entity template will be generated.
The entity template tries to replicate the scene configurations built by you in your DCC tool, such as Blender. So if you created a layout in your modeling software, placing objects at certain places, etc, it will be there as an entity template. You will usually not use the raw entity template, but it is useful for you to drop the objects into your scene to quickly identify them or to make them local instead of using a template and start editing in Cave.
Once you import your asset, check for common issues:
- Is the object too small?
- Is it too large?
- Is it rotated incorrectly?
- Was it split in an unexpected way?
- Does the generated template look correct?
It is better to catch these issues immediately instead of after you have already used the asset across a level.
If you find any issue with the assets you import, it's worth opening them in Blender or any DCC you want to see if they are correct. We also recommend you to triangulate the asset meshes before importing it into Cave.
IMPORTANT: When you import a 3D model into Cave, it automatically tries to triangulate the faces. But sometimes, it may have triangulation mistakes, causing your 3D model to have "holes" or wrongly created faces. To avoid this, we always recommend that you go to your DCC modeling tool and triangulate the faces yourself.
Understanding Materials and Textures
Imported models can also generate materials and textures.
A material controls how a surface looks. A texture provides image data used by the material.
After importing, always check the material:
- Is the albedo texture assigned?
- Are normal maps assigned correctly?
- Are roughness or metallic maps imported?
- Does the material look correct in the viewport?
Imports are useful, but they are not magic.
It is normal to adjust materials after importing. For example, you might need to tweak roughness, fix a missing texture, or choose a better material setup for the visual style of your game.
Multimaterial Meshes
In Cave, a mesh uses one material. If an object in your DCC tool uses multiple materials, Cave represents that as multiple meshes.
One entity can still have multiple Mesh Components, so the final object can look the same in the scene. The structure is just different:
Object With Multiple Materials
  Mesh Component using Material A
  Mesh Component using Material B
  Mesh Component using Material C
This gives Cave a clean one-mesh-to-one-material relationship while still allowing complex imported objects to appear correctly.
Due to how cave works, if you import a multi-material mesh into your project, you will notice that in the asset browser, the mesh will be split into different parts. But Cave will attempt to recreate the final entity in the Entity Template for you with all the meshes combined.
Imported Entity Template
When importing a model, Cave will create an Entity Template that represents the original setup. This template is useful because it preserves the intended composition as much as possible.
For example, an imported building might generate:
- Several mesh assets.
- Several material assets.
- Texture assets.
- One Entity Template that puts the parts together.
That template is usually the easiest asset to drag into the scene.
If the imported object looks correct as a template, you can reuse it just like any other Cave template. The goal is to bring those assets into scenes and turn them into playable spaces.
Basic Importing Tips
Keep imports clean:
- Prefer FBX for models.
- Triangulate Faces before.
- Use OGG for audio.
- Keep asset names readable.
- Prefer names with spaces or PascalCase.
- Import into organized folders.
- Check import scale.
- Inspect generated materials.
- Test the imported template in the viewport.
- Save after importing.
Importing is a normal part of development.
Do it in small steps, inspect the result, then keep building. A clean import workflow will save you a lot of time once your project starts using more custom content.