Visual Scripting Tutorial (Logic Bricks)
Creating the Collectable Item Logic
Lesson 6 of 10 • 10 XP
Keep your place in this quest
Log in or sign up for free to subscribe, follow lesson progress, and access more learning content.
In this lesson, we will create the logic used to collect the item using Cave Engine’s Logic Bricks.
You will learn how to detect when the Player collides with a collectable item, identify that item using a tag, remove it from the scene, and update a simple UI counter showing how many items were collected.
This is the beginning of a very common gameplay system: item interaction. The same idea can later be expanded to create coins, keys, ammo pickups, health pickups, quest objects, power-ups, or any other object the Player can collect.
1. Creating the Logic to Collect the Item
Inside the logic of our Player, we will detect collisions with collectable items directly from the Player itself.
After the movement logic, we will create the system responsible for detecting contact with the item and removing it from the scene.
First, get the Entity and access its Character Component using Get Character.
From the Character Component, use the Get Collision With node. This node allows us to detect collisions based on a specific Tag.
In this case, we will use the tag item, which was assigned to our collectable item in the previous lesson.
This is why adding a tag to the item was important. Instead of checking for a specific Entity name, we can simply ask the Player if it collided with anything tagged as item. This makes the logic more flexible, because any collectable object with that same tag can be detected by the same system.
The result of this detection should be connected to a Get node, which returns the collision information, also known as Collision Info.
Then we get index 0, which represents the first detected collision.
Finally, connect this result to the Kill node, which is responsible for removing an Entity from the scene.
The Entity that will be removed comes directly from the Collision Info. In other words, the collected item itself is passed as the input to Kill, making it disappear from the scene when touched by the Player.
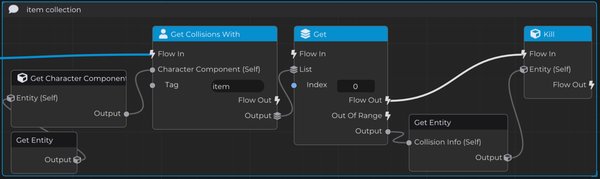
With this logic, the Player can already detect a collectable item and remove it from the scene.
In practice, this means that when the Player touches an Entity tagged as item, that Entity will be collected and deleted from the current scene.
2. Creating the Collectable UI
Now we need to show the player that an item was actually collected.
To do that, we will create a simple UI interface that displays:
- the item icon
- the number of collected items
- the total number of items available in the map
To start, access the Player Template and add an Interface component, specifically a UI Element. This UI Element will be responsible for building the visual part of our HUD.
From this element, we will create and configure the collectable item icon. This icon will serve as the visual base for showing the collection information on the player’s screen.
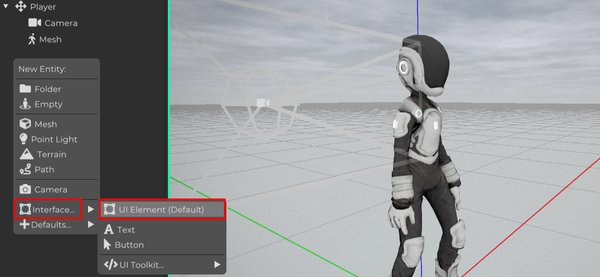
In the Basic tab of the UI Element, we can configure the icon position and scale.
By clicking the anchor icon of the position property, you can anchor it to the bottom-left corner of the screen.
In the scale configuration, keep the reference point locked in the center and keep the position and scale locks enabled. This makes the values relative and helps the layout adapt correctly to different screen resolutions.
Finally, set the Layer value to 2. This guarantees that the icon will be rendered above other UI Elements with lower priority.
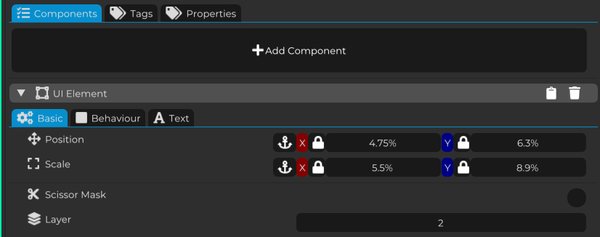
Adjust the Scale values until the icon has the size you want.
Then use the Position values to place it on the left side of the screen, or in any other area you prefer inside the interface.
These settings allow you to precisely control both the size and the position of the element in the HUD.
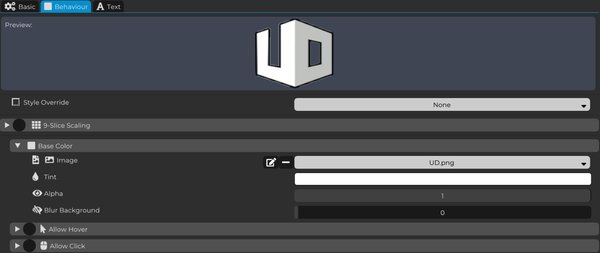
In the Behaviour tab, we can remove the Default Style that comes by default and add a custom Texture for our icon.
You can also adjust the Tint color and the Alpha transparency to achieve the visual result you want.
The 9-Slice Scaling option is used to avoid distortion when an image is stretched in the layout. When enabled, you can adjust its values according to the needs of the icon, keeping the image consistent even when resized. In our case, we'll not be using the 9-Slice, since our image is an icon.
Now let’s create 3 new interface Entities of type Text.
They will be responsible for displaying the number of collected items and the total number of available items in the map.
First, rename the first Text to TextCollect. This text will display the number of items collected by the player.
Then, the second Text will contain only the “/” character, working as a visual separator between the values in the UI.
Finally, rename the third Text to TextMax. This one will represent the maximum amount of items available in the map.
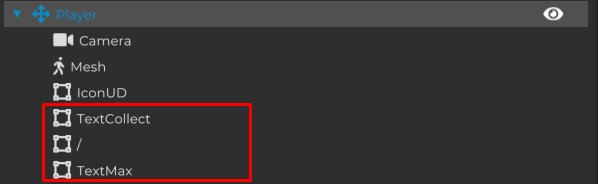
Now access the Text tab of the UI Elements that were created.
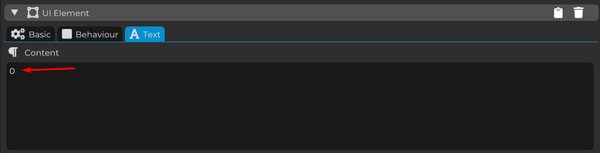
In this section, there is a field where we can define the content that will be displayed on the screen.
For the two texts that represent item values, TextMax and TextCollect, let’s keep the initial value as 0.
The text used as the separator should contain only the “/” character, visually separating the collected amount from the total amount of items.
Now let’s position the UI texts so they are organized next to the icon.
- First, position TextCollect.
- Then place the “/” text right after it.
- Finally, position TextMax after the slash.
This way, the UI will be organized as a progress counter, clearly displaying something like:
collected items / total items
For example:
0 / 10

Note: Alternatively, you can also create a single Entity and programatically (via Logic Bricks), concatenate the strings to achieve the same result.
3. Creating the Item Counter Logic
Now we need to make the UI reflect the collected items.
At the moment, the item can be removed from the scene, but the UI still does not know that the Player collected anything. So now we will implement the counter logic.
First, go back to the Player Logic Brick and create a new property called Collected Item, of type Int.
This property will store how many items the Player has collected during the game.
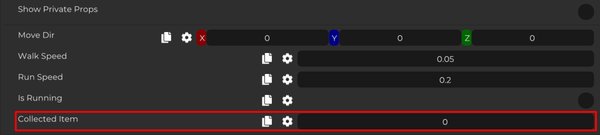
The initial value of this property should be 0.
In the Player logic, right after the Kill node that removes the collected item, we will create the logic responsible for updating the item count.
First, get the Collected Item property.
Then add +1 to its current value.
Finally, set the result back into the Collected Item property.
This way, every time the Player collects an item, the value of Collected Item will increase by 1, keeping the counter updated.
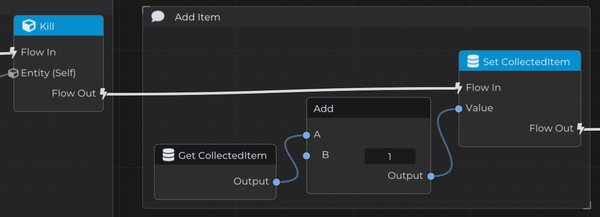
However, this value is still only stored in the property. Now we need to display it in the UI text.
Right after that, continue the logic by connecting the flow from Set Collected Item to a Set Text node.
This node will be responsible for updating the text displayed in the interface.
To use Set Text, we need to provide two things:
- the UI Element Component that will have its text updated
- the new text value
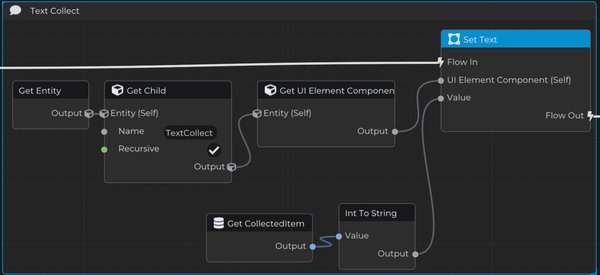
Since the texts were created as children of the Player, we can access them directly through the Entity hierarchy.
To do this, use Entity, then Get Child, informing the name of the text object. Enable the Recursive option to make sure the search also happens inside children of children of the Player.
Then get the UI Element Component from the Entity that was found.
For the text value, get the Collected Item property, convert it to String, and connect it to Set Text.
This way, the UI text will automatically be updated with the same value stored in the Player property.
Now let’s make the text that represents the total number of items work as well.
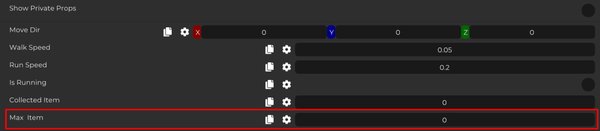
Still in the Player Logic Bricks, create a new property called Max Item, of type Int.
This property will store the total number of collectable items available in the map.
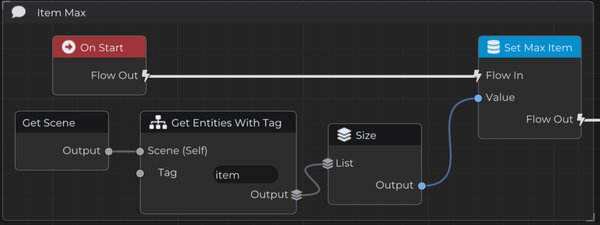
Now, to store the total number of items in the map inside this property, we will use the Player’s On Start event.
This value only needs to be calculated once at the beginning of the game, because it represents how many collectable items exist in the scene when the game starts.
First, get the game Scene.
Then use the node that returns all Entities in the scene filtered by the item tag. Since this tag is present only in our collectable items, this will return the list of all collectables in the current map.
With this list of Entities, use the Size node.
The Size node returns the total number of elements in the list as an integer. This value represents exactly how many items exist in the map.
Finally, set this result into the Max Item property, making sure the game starts with the correct total amount of collectable items stored in the property.
Now we only need to send this value to the UI text.
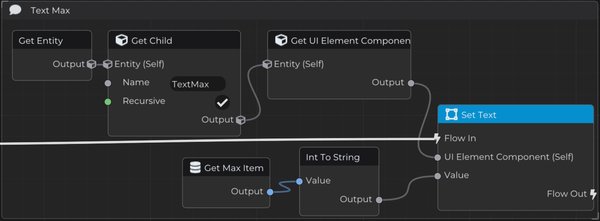
To do this, we will use the same logic we used for Collected Item.
Get the Max Item property, convert the value to String, and connect it to the Set Text node.
Then access the UI Element corresponding to the maximum item text by using the Player hierarchy with Get Child, typing the correct name and enabling Recursive if necessary.
Finally, connect that UI Element Component to Set Text.
This way, the total number of items will be correctly displayed in the player interface.
At this point, the collectable item system is functional.
The Player can detect collectable items using the item tag, remove them from the scene, increase the collected item counter, and update the UI to show both the collected amount and the total amount of items available in the map.