Cave: Erste Schritte Anleitung
Moving Around the 3D and Editing the World
Lesson 4 of 19 • 30 XP
Keep your place in this quest
Log in or sign up for free to subscribe, follow lesson progress, and access more learning content.
Now that you know what the main editor tabs are, it is time to move around the 3D View and edit objects in the scene.
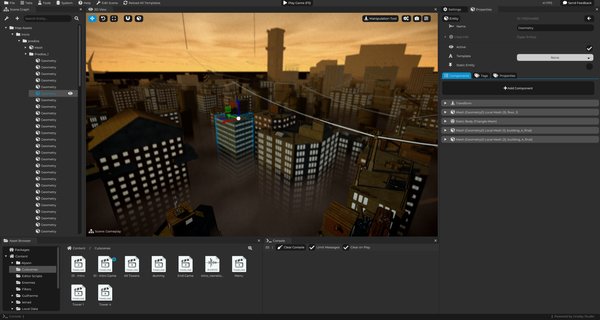
This lesson covers the basic controls you will use constantly: navigating, selecting, moving, rotating, scaling, creating, duplicating, deleting, and organizing entities.
Navigating the 3D View
The 3D View can be controlled in a way that feels similar to a first-person game.
Hold Right Mouse Button and move the mouse to look around.
While holding Right Mouse Button, use:
| Input | Action |
|---|---|
W |
Move forward. |
S |
Move backward. |
A |
Move left. |
D |
Move right. |
E |
Move up. |
Q |
Move down. |
| Mouse wheel | Change the free camera speed. |
C + mouse wheel |
Change mouse look sensitivity. |
| --- |
If you need to fine-tune the mouse sensitivity and other settings, go to the top right corner of the 3D view at Advanced Viewport settings, then go to View Camera and tweak the values as you need.
You can also use Blender-style navigation:
| Input | Action |
|---|---|
Middle Mouse Button |
Orbit around the view target. |
Shift + Middle Mouse Button |
Pan the view. |
| Mouse wheel | Zoom in or out. |
| --- |
There are also two useful right-mouse variations:
| Input | Action |
|---|---|
Shift + Right Mouse Button |
Pan the view. |
Ctrl + Right Mouse Button |
Zoom the view. |
| --- |
If you get lost in the scene, select an entity and press F to focus the camera on it.
Selecting Entities
You can select entities in two main ways:
- Click an entity in the
3D View. - Click an entity in the
Scene Graph.
When you select an entity, Cave makes it the active selection and shows its settings in the Properties tab.
If you click empty space in the 3D View, Cave can clear the active entity selection and show scene-related information instead.
To select multiple entities, hold Shift while selecting. This keeps the previous selection and adds another entity to it.
Multi-selection is useful when you want to move, duplicate, delete, or organize several objects at once.
Deselecting Entities
If you want to, you can also deselect entities by clicking at the sky. This will actually select the scene itself and display the scene settings in the Properties tab.
Moving, Rotating, and Scaling
The default editing tool in the 3D View is the manipulation tool. It gives you gizmos for moving, rotating, and scaling selected entities.
Use these shortcuts:
| Shortcut | Tool |
|---|---|
W |
Move. |
E |
Rotate. |
R |
Scale. |
| --- |
You can also switch tools from the buttons in the 3D View overlay (top left corner.
The gizmo uses the usual 3D axis colors:
| Axis | Color |
|---|---|
| X | Red. |
| Y | Blue. |
| Z | Green. |
| --- |
If you are coming from other 3D software or a game engine, you will notice that cave engine colors the X, Y, Z axes differently, giving the blue color to the Y axis. The reason is that the blue color is an indicator for you to remember that in cave, the Y axis is facing up, meaning that it is facing the sky (blue).
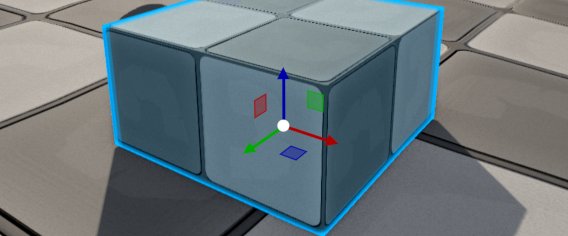
Drag an axis to transform the selected entity on that axis. Drag the center or combined handles when you want to transform on more than one axis at the same time. If you hold Alt while dragging the gizmos, it will duplicate the Entity.
The transform values appear in the Properties tab, so you can edit them visually with the gizmo or precisely with numbers.
Local and World Orientation
The manipulation tool can work in different orientations.
World orientation uses the scene's global axes. Local orientation uses the selected entity's own rotation.
This matters most when an entity is rotated. In world mode, moving on X always follows the world's X axis. In local mode, moving on X follows the entity's rotated X axis.
Scale is always handled in local space.
Snapping
Snapping helps you make clean, consistent edits.
When snapping is enabled, Cave moves, rotates, or scales entities in fixed steps instead of completely free values.
The manipulation tool has snapping options for:
- Movement.
- Rotation.
- Scale.
By default, movement snapping uses meter-based steps, rotation uses degree-based steps, and scale uses multiplier steps.
Holding Ctrl temporarily inverts the current snapping behavior. If snapping is enabled, holding Ctrl disables it while held. If snapping is disabled, holding Ctrl enables it while held.
Snapping is especially helpful for modular levels, tile-like layouts, doors, walls, props, and anything that should line up cleanly.
Resetting Transforms
You can quickly reset parts of an entity transform:
| Shortcut | Action |
|---|---|
Alt + W |
Reset position. |
Alt + E |
Reset rotation. |
Alt + R |
Reset scale. |
| --- |
These are useful when an object becomes hard to position manually or you want to return it to a clean default state.
Placing Entities on Surfaces
If an entity is selected, pressing G can move it to the surface under the mouse cursor. This is useful when placing props, lights, items, or other scene objects directly onto level geometry.
You can also use Alt + G to duplicate and place, which is handy when dressing a scene with repeated objects.
Adding New Entities
There are several ways to create entities.
In the 3D View, press Shift + A to open the new entity popup.

You can also create entities from the Scene Graph.
If you use the shortcut instead of right-clicking the scene graph, it will add the entity at the position that the mouse is hovered in the 3D view.
Below you will see a list of the common entity types, but it is important to already anticipate that, as you will see in a few lessons, Cave Engine does not differentiate any entity types. There is only one actual entity type, which is the entity itself. What differentiates it is the component that composes it. So the naming below is just a way for you to quickly understand which components are composing that specific entity. You will learn more about it later:
| Entity Type | What it is for |
|---|---|
| Folder | Organizing other entities. |
| Empty | A basic entity with a transform. |
| Mesh | A visible 3D object. |
| Point Light | A light source. |
| Terrain | A terrain object. |
| Path | A path object. |
| Camera | A camera entity. |
| UI Element | A user interface entity. |
| Text | UI text. |
| Button | UI button. |
| --- |
Cave may also show project-specific default entities when the required assets are available, such as default vehicle or character setups.
Duplicating, Copying, and Deleting
Use these shortcuts while editing entities:
| Shortcut | Action |
|---|---|
Shift + D |
Duplicate selected entities. |
Ctrl + D |
Duplicate selected entities. |
Ctrl + C |
Copy the active entity. |
Ctrl + V |
Paste from the clipboard. |
Delete |
Delete selected entities. |
Ctrl + Z |
Undo the last supported editor action. |
| --- |
Duplicating is one of the fastest ways to build a scene. Create one object, configure it, duplicate it, and then adjust each copy.
When working with parented entities, pay attention to the hierarchy. A duplicated or deleted parent can affect the children below it.
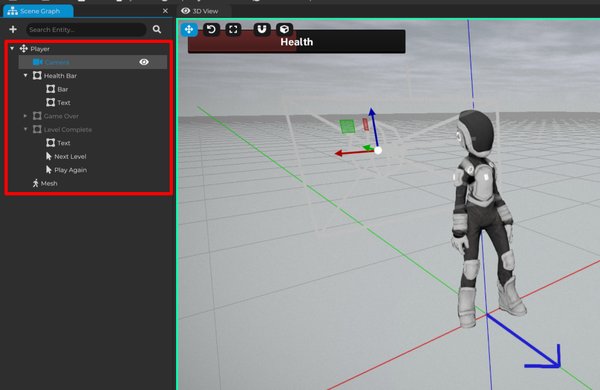
Parenting and Organizing Entities
Parenting connects one entity under another. When creating this parent-child hierarchy, child entities will move with the parent entities, and it will also be added, duplicated, or deleted together with the parent entity.
How it works:
- You can parent entities by dragging them in the
Scene Graph. - You can also select multiple entities and press
Shift+Pto make the active entity the parent of the others. - To remove a parent, select the child and press
Alt+P. - You can also right click an Entity in the
Scene Graphand select "Remove Parent".
Use parenting when objects should move together. For example:
- A weapon attached to a character.
- A light attached to a moving vehicle.
- A group of props organized under a folder.
- UI elements grouped under a parent panel.
Folders are especially useful because they let you organize the scene without needing the folder itself to be a visible gameplay object.
Names, IDs, and Active State
Every entity has a name. Good names make your scene easier to understand. You can right-click the Entity in the Scene Graph to edit its name or select the entity and edit the name in the Properties Tab.
Instead of leaving everything as generic names, use names that describe the role of the object:
| Weak Name | Better Name |
|---|---|
Mesh |
Wooden Crate |
Light |
Cave Entrance Light |
Empty |
Player Start |
Folder |
Gameplay Triggers |
Cave also tracks internal IDs for entities and assets. You usually do not need to think about those IDs while building, but they help the engine identify things reliably behind the scenes.
Entities can also be active or inactive. An inactive entity stays in the project and scene, but it is not participating in the scene in the same way as an active one. That is different from deleting. Deleting removes the entity from the scene. Disabling keeps it available for later.
The difference between activating an entity or adding and deleting the entity is much more clear while in-game. Because in-game, if you delete an entity and then add it again, the newly added one will have all its internal states restarted, so any changes made to it, like the properties, variables, and the child hierarchy, will not going to be carried over from the old entity to the new one. That's not the case for entity activation. If you deactivate an entity, when you activate it back, it will keep all its old states, the position, properties, child hierarchy, etc.
A Good Editing Loop
A normal scene editing loop looks like this:
- Navigate the 3D View.
- Select or create an entity.
- Move, rotate, or scale it.
- Edit its settings in Properties.
- Organize it in the Scene Graph.
- Save the project.
- Test the result in Play Mode.
You will repeat this loop constantly while making a game in Cave.