Cave: Terrain System Introduction
Terrain Tool e Brushes
Lesson 2 of 6 • 10 XP
Keep your place in this quest
Log in or sign up for free to subscribe, follow lesson progress, and access more learning content.
In this lesson, you will learn how the Terrain Tool works and get an overview of the main brushes available for editing terrains in Cave Engine.
Before sculpting a terrain, it is important to understand what each brush does. Each tool has a specific purpose, and knowing when to use each one will make the terrain creation process much faster and more controlled.
With the Terrain Tool, you can sculpt hills, create flat areas, smooth surfaces, apply noise, align the terrain to paths, and prepare the base shape of your environment directly inside the 3D View.
1. Terrain Tool
Before editing the terrain, you need to change the current tool from Manipulation Tool to Terrain Tool.
The Manipulation Tool is used for selecting, moving, rotating, and scaling Entities. But to edit the actual terrain surface, we need to switch to the specific tool made for terrain editing.
The Terrain Tool enables all terrain editing features, allowing you to sculpt, paint textures, and apply modifications directly to the terrain surface.
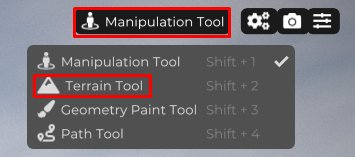
Now that the Terrain Tool is active, all terrain editing options will become available.
This is where you will choose the brush mode, adjust the brush size, control its strength, configure the falloff, and start modifying the terrain directly in the scene.
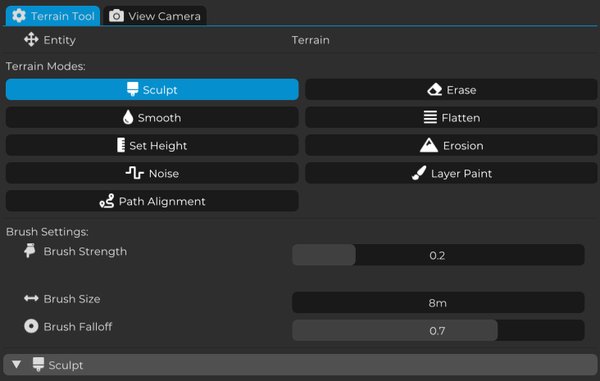
2. Brush Options
In the Terrain Brush panel, you will find all brushes available for editing and modifying the terrain.
Each brush has a specific function, allowing you to create different types of relief and surface adjustments. Some brushes are used to build the main shape of the terrain, while others are better for refinement and polishing.
Before using them in a real level, it is a good idea to test each brush in a small area and understand how it reacts with different brush sizes and strengths.
- Sculpt

The Sculpt brush is the main tool for shaping the terrain.
With it, you can raise or lower the surface, creating mountains, hills, valleys, craters, ramps, and many other terrain variations.
The effect is applied based on the brush shape, size, falloff, and strength. Because of that, this will probably be the brush you use the most when creating the first version of your terrain.
Use Sculpt when you want to define the main silhouette of the environment.
- Smooth

The Smooth brush softens the terrain relief by reducing abrupt height differences between sculpted areas.
It is ideal for removing imperfections, smoothing mountains, rounding slopes, and creating more natural transitions between different elevations.
After using Sculpt, the terrain can sometimes look too sharp or irregular. In those cases, Smooth is a very useful brush to make the surface look more organic.
- Set Height

The Set Height brush defines a fixed height for the terrain.
Instead of gradually raising or lowering the surface, this tool adjusts the affected area to a specific height value.
This is very useful for creating platforms, flat plains, roads, bases for buildings, arenas, or any region that needs to remain perfectly leveled.
Use Set Height when you already know the exact height you want a region to have.
- Noise

The Noise brush applies random height variations to the terrain using procedural noise.
This tool is excellent for breaking surfaces that look too smooth or artificial. It adds small natural details that make the terrain feel more organic.
For example, after creating a large flat area, you can use Noise with a low strength to add subtle irregularities and make the surface look less perfect.
- Path Alignment

The Path Alignment brush automatically adjusts the terrain relief to follow a previously defined path.
This tool is especially useful for creating roads, trails, rivers, ramps, or any route that needs to follow a consistent height across the terrain.
Instead of manually sculpting the entire path area by hand, Path Alignment helps reduce the amount of manual work and gives you a cleaner base to continue refining.
- Erase

The Erase brush restores the affected area to the default terrain height.
It works like an eraser, removing previous modifications and returning the surface closer to its original state.
This is useful when you want to correct mistakes, clean a region, or restart the shape of a specific part of the terrain without recreating the whole terrain from scratch.
- Flatten

The Flatten brush levels the terrain using the height of the point where the mouse was first positioned as the reference.
Different from Set Height, which uses a numeric value defined by the user, Flatten copies an existing height from the terrain and applies it to nearby areas.
This makes it very useful for extending flat regions naturally from an existing point, such as expanding the top of a hill, creating a building area, or making a flat path from a specific terrain height.
- Erosion

The Erosion brush simulates the natural process of terrain erosion.
It creates grooves, worn areas, and more organic transitions between elevations, making mountains, slopes, and valleys look more natural.
This brush is especially useful as a finishing tool after the first sculpting pass. Once the main terrain shape is already created, Erosion can help make the environment look less artificial and more believable.
At this point, you should have a good overview of the main terrain brushes available in Cave Engine.
In the next lessons, we will start using these tools in practice to sculpt the terrain and build the actual shape of the environment.